

| << Chapter < Page | Chapter >> Page > |
The end of the program
Listing 4 also signals the end of the program. Note that even though the mouseUpEffect trigger resulted from a mouseUp event, an event listener was not registered to listen for and to service the mouseUp event.
Three steps are required
Generally speaking, three steps are required to implement this approach:
That is all that is required to play an effect when an effect trigger occurs.
Suppose you want to do something a little more creative, such as to cause the effect that is played for a particular trigger to differ from one time to thenext depending on some condition in the program.
Or, perhaps you want to play an effect on a component completely independent of triggers, such as when a player's score in a game reaches 10,000. Iwill show you how to do those kinds of things in this program.
Program output at startup
The best thing that you could do at this point would be to run the program online. That way, you can interact with the program as you read the following.
Figure 3 shows the program output at startup.
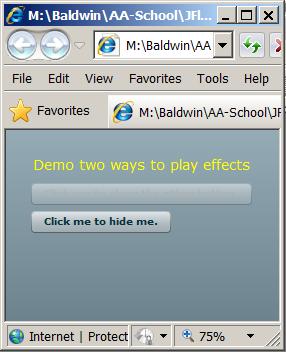
At this point, the output consists of one label and two buttons. The top button is disabled and the bottom button is asking to be clicked in order tobe hidden.
Program output after clicking the bottom button
Figure 4 shows the program output after the bottom button from Figure 3 has been clicked.
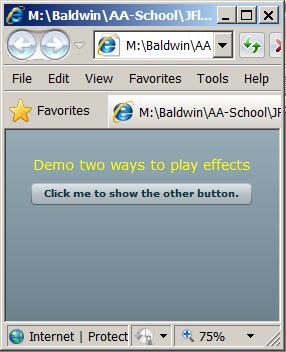
Only the top button is showing
At this point, the bottom button in Figure 3 has been hidden and the top button in Figure 3 has been enabled. From this point forward, the userwill alternate between clicking the top and bottom buttons.
Do it several times
You need to go through the sequence several times to experience the full effect. Each time theuser clicks the top button, it becomes disabled and the bottom button becomes visible. Each time the bottom button becomes visible, an effect is played.Effects are played in the following sequence:
The sequence repeats after the three effects are played in parallel.
The next four figures show screen shots of the effects listed above caught in midstream.
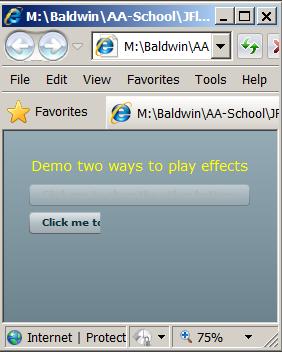
The WipeRight effect
Figure 5 shows the restoration of the bottom button with a WipeRight effect. As you can see, only part of the button was visible when thescreen show was taken.
The Rotate effect
Figure 6 shows the Rotate effect caught in midstream.
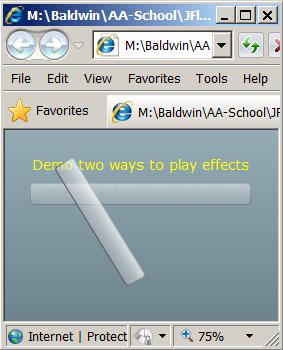
The bottom button rotates a full 360 degrees around its center point before coming to rest in the position shown in Figure 3 with its label restored.
Notification Switch
Would you like to follow the 'Object-oriented programming (oop) with actionscript' conversation and receive update notifications?

|
|

|
|

|
|

|
|

|
|
|
|
|

|
|

|
|

|
|

|