Published: July 24, 2007
By Richard G. Baldwin
Java Programming Notes # 2222
First of two parts
This lesson is the first part of two-part tutorial on using Java and JDOM to create SVG files.
What you have learned
In previous lessons, you learned how to use Sun's JAXP DOM API to do the following:
By Sun's JAXP DOM API, I am referring mainly to the interfaces and other material in the org.w3c.dom package of Sun's J2SE 5.0.
There is a better way
While Sun's JAXP DOM API is a powerful way to accomplish these tasks, it can be very complicated, and in my opinion, it is not the best way. There is a better way, and that better way is JDOM (see Resources). Some of the problems with Sun's JAXP DOM API and the advantages of JDOM are spelled out in Chapter 14 of Elliotte Rusty Harold's book, Processing XML with Java.
What is JDOM?
Here is a statement of the JDOM mission taken from the JDOM website:
We want to provide a solution for using XML from Java that is as simple as Java itself.
There is no compelling reason for a Java API to manipulate XML to be complex, tricky, unintuitive, or a pain in the neck. JDOMTM is both Java-centric and Java-optimized. It behaves like Java, it uses Java collections, it is completely natural API for current Java developers, and it provides a low-cost entry point for using XML.
While JDOM interoperates well with existing standards such as the Simple API for XML (SAX) and the Document Object Model (DOM), it is not an abstraction layer or enhancement to those APIs. Rather, it provides a robust, light-weight means of reading and writing XML data without the complex and memory-consumptive options that current API offerings provide.
Why learn about both approaches?
At this point, you may be wondering why I spent all of that time and effort teaching you how to use Sun's JAXP DOM API to create SVG code if JDOM is a better way. The reason is simple. Because Sun's JAXP DOM API is part of J2SE 5.0, it is very likely to be available on any server that supports servlets. JDOM, on the other hand, while widely used, is probably less likely to be available on some servers. Therefore, if JDOM is available on your server of choice, you should use it. If it is not available, you will need to fall back and use Sun's JAXP DOM API. Therefore, you need to understand and know how to use both approaches.
A JDOM/SVG graphics library
In earlier lessons, I taught you how write your own Java SVG graphics library making use of Sun's JAXP DOM API to eliminate, or at least alleviate the requirement to write raw XML code or raw JAXP DOM code. The use of the SVG graphics library makes it possible for you to produce SVG output simply by making typical Java method calls. In the two parts of this tutorial, I will teach you how to write your own Java SVG graphics library making use of JDOM to accomplish the same purpose.
|
This is not a lesson on how to use JDOM. (How to use JDOM for a variety of useful purposes would probably be a good topic for a future series of tutorial lessons.) Rather, this is a lesson on SVG. In this lesson, I will teach you just enough about JDOM that you can use it to create SVG code to produce rich graphics in your browser.
I recommend that you open another copy of this document in a separate browser window and use the following links to easily find and view the figures and listings while you are reading about them.
I recommend that you also study the other lessons in my extensive collection of online Java tutorials. You will find a consolidated index at www.DickBaldwin.com.
According to Wikipedia, the free encyclopedia,
JDOM is an open source Java-based document object model for XML that was designed specifically for the Java platform so that it can take advantage of its language features. JDOM integrates with Document Object Model (DOM) and Simple API for XML (SAX), supports XPath and XSLT. It uses external parsers to build documents. JDOM was developed by Jason Hunter and Brett McLaughlin starting in March 2000. It has been part of the Java Community Process as JSR 102, though that effort has since been abandoned. The name JDOM is a pseudo-acronym for Java Document Object Model.
According to Chapter 14 of Elliotte Rusty Harold's book, Processing XML with Java,
JDOM is a tree-based API for processing XML documents with Java that threw out DOM’s limitations and assumptions and started from scratch. It is designed purely for XML, purely for Java, and with no concern for backwards compatibility with earlier, similar APIs. It is thus much cleaner and much simpler than DOM. Most developers find JDOM to be far more intuitive and easy to use than DOM. It’s not that JDOM will enable you to do anything you can’t do with DOM. However, writing the same program with JDOM will normally take you less time and have fewer bugs when finished, simply because of the greater intuitiveness of the API. In many ways, JDOM is to DOM as Java is to C++, a much improved, incompatible replacement for the earlier more complex technology.
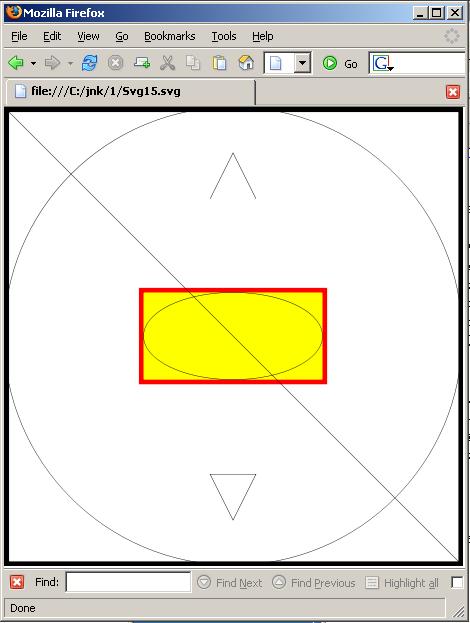
In this lesson, I will present and explain two programs named Svg15 and Svg16. Both programs use JDOM 1.0 to create an XML file named Svg15.svg that draws at least one of each of the following six basic SVG shapes when rendered in an SVG graphics engine such as Firefox 2.0.0.4:
The graphic output from both programs is shown in Figure 1.
Figure 1. Graphic output from both programs.
|
|
Differences between the two programs
The program named Svg15 uses raw JDOM code to produce the SVG code contained in the output file. The main purpose of this program is to introduce you to the use of JDOM and to teach you how to create an SVG file using raw JDOM commands.
A secondary purpose of this program is to teach you how to use an SVG viewBox element to work in convenient virtual canvas dimensions, (such as 1000x1000) instead of having to work in less convenient actual canvas dimensions (such as 459x459). The use of the viewBox element will be extended in the second part of this tutorial to teach you the significance of the word Scalable in the name Scalable Vector Graphics (SVG).
|
A preview of Part 2
Part 2 of this tutorial will:
A small bit mapped image
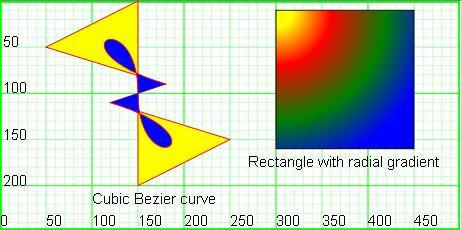
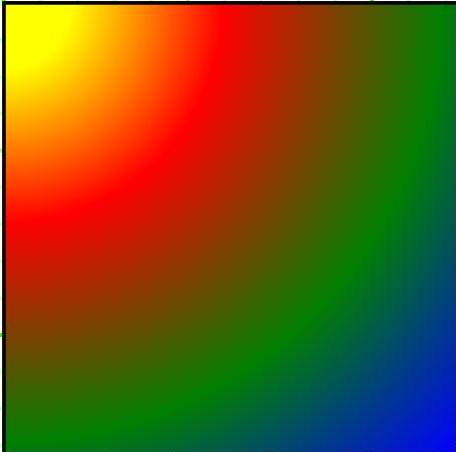
Figure 2 shows a small graphic image containing a blue cubic Bezier curve and in a yellow background and a radial gradient in a rectangle. This drawing was produced using a program similar to one that I will present and explain in Part 2.
Figure 2. Drawing with a Bezier curve and a radial gradient.
|
|
Enlarge the bit mapped image
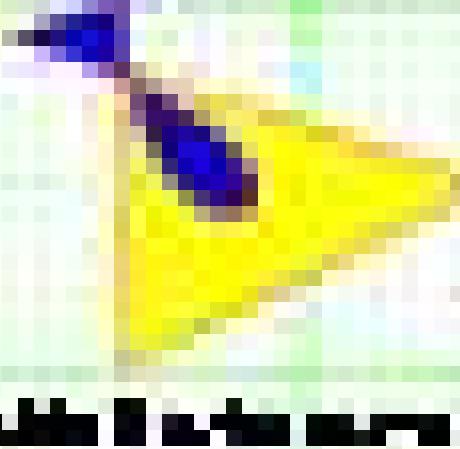
I captured the image shown in Figure 2 as a bit mapped JPEG image using a standard screen capture program. Then I enlarged the bit mapped image by a factor of four, producing the result shown in Figure 3.
Figure 3. Bit mapped image enlarged by a factor of four.
|
|
As you would expect (if you are familiar with the limitations of bit mapped images) the results aren't very pleasing. To make a long story short, bit mapped images aren't very scalable, at least insofar as enlargement is concerned.
Enlarge the SVG drawing by a factor of four
Figure 4 shows the result of increasing the size of the SVG drawing by the same factor of four. This result shows the significance of the word Scalable in the name Scalable Vector Graphics (SVG).
Figure 4. SVG drawing enlarged by a factor of four.
|
|
|
Enlarge the SVG drawing by a factor of sixteen
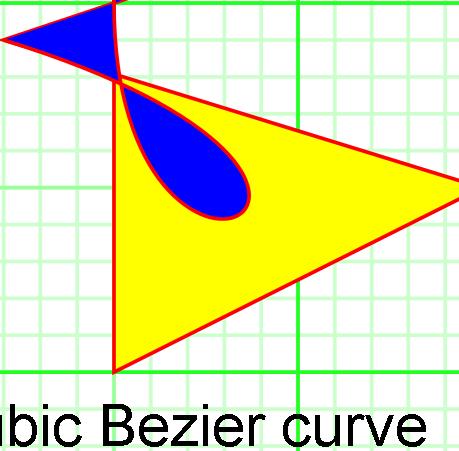
To drive home the point that scaling the SVG drawing does not degrade the quality of the drawing, Figure 5 and Figure 6 show captured portions of the drawing produced by enlarging the original drawing shown in Figure 2 by a factor of sixteen.
Figure 5. Svg drawing enlarged by a factor of sixteen.
|
|
Note that because I am limited as to the width of images that I can publish on this web site, I was unable to publish the entire enlarged drawing. Therefore, it was necessary for me to capture and publish portions of the drawing that was enlarged by a factor of sixteen.
Figure 6. Svg drawing enlarged by a factor of sixteen.
|
|
Once again, the small amount of degradation that you can see in Figure 5 and Figure 6 did not exist in the original rendering of the drawing in the Firefox 2.0.0.4 browser window. That degradation was introduced by the process of capturing the image from the screen as a JPEG image and importing it into this document.
Could continue to enlarge indefinitely
I could continue this process of enlarging the SVG drawing indefinitely and no degradation would be introduced into the drawing. That is the true significance of the word Scalable in the name Scalable Vector Graphics (SVG).
What about the bit mapped image?
To drive home the point that bit mapped images are not scalable, Figure 7 shows the result of enlarging the original bit mapped image from Figure 2 by a factor of sixteen and capturing a portion of the enlarged image for publication in this lesson.
Figure 7. Enlargement of bit mapped image by a factor of sixteen.
|
|
The image shown in Figure 7 is approximately the same portion of the enlarged image as that shown in Figure 5. However, because of the poor quality of the image, it was not possible for me to identify and capture the exact same portion.
As you can see, bit mapped images are not scalable in the same way that SVG drawings are scalable.
Downloading and installing JDOM
You will need to download and install the JDOM API before you can compile and run this program. Fortunately, that is an easy task to accomplish.
You can access the JDOM download page from the JDOM Main Page (see Resources). It has been a while since I did it, but my recollection is that it was not difficult to download and install both the API and the javadoc documentation, at least for Windows XP.
When I did the download, the file that I received was named jdom-1.0.zip. When I looked inside that file, I found a file named README.TXT. That file contained everything that I needed to know in order to install the API. I also found a file named readme that contained supplemental information about the JAR files contained in the download.
Be sure to pay attention to the following explanation and instruction that is contained in the second file mentioned above:
"jdom.jar This JAR is created during the build process and put in the "build" directory. This contains the org.jdom.* classes and you should add this JAR to your classpath when using JDOM."
Description of the program
The program named Svg15 uses JDOM 1.0 to create an XML file named Svg15.svg. The contents of that file draw at least one of each of the following six basic SVG shapes when rendered in an SVG graphics engine such as Firefox 2.0.0.4:
Purpose of the program
The main purpose of this program is to teach you how to create an SVG file using raw JDOM commands. The program named Svg16 that I will present later in this lesson will show how to write a Java/JDOM/SVG graphics library that eliminates much of the effort of SVG programming using raw JDOM commands.
A secondary purpose of this program is to illustrate the use of a viewBox element to make it possible for you to work in convenient virtual canvas dimensions, (such as 1000x1000), instead of having to work in less convenient physical canvas dimensions, (such as 459x459).
Program testing
The file produced by this program validates at: http://validator.w3.org/
The program was tested using J2SE 6.0, JDOM 1.0, and Firefox 2.0.0.4 running under WinXP.
Will discuss in fragments
As is my custom, I will present and explain this program in fragments. The first fragment, which shows the beginning of the class and the beginning of the main method, is presented in Listing 1. You can view the entire program in Listing 32 near the end of the lesson.
Listing 1. Beginning of class and main method for Svg15.
public class Svg15{
  public static void main(String[] args){
    String ns = "http://www.w3.org/2000/svg";
|
Listing 1 creates a String variable containing the namespace URI. This variable is used to reduce the amount of typing that is required later. Note that the variable name is short and easy to type.
JDOM and namespaces
Here is what Elliotte Rusty Harold tells us about JDOM and namespaces in Chapter 14 of his book, Processing XML with Java (see Resources).
"The basic JDOM rule about namespaces is that when an element or attribute is in a namespace, rather than specifying its full qualified name, you give its local name, its prefix, and its URI, in that order. If the element is in the default namespace, omit the prefix."
What this tells us is that each time that we create a new element we must pass the namespace URI to the constructor for the element. As you can see in Listing 1, the actual namespace string for SVG is fairly long. That is the rationale for defining it in a String variable that is short and easy to type.
Create DTD strings
For clarity, the code in Listing 2 creates strings containing:
Listing 2. Create DTD strings.
    String dtdConstrainedElement = "svg";
    String dtdPublicID = "-//W3C//DTD SVG 1.1//EN";
    String dtdSystemID =
       "http://www.w3.org/Graphics/SVG/1.1/DTD/svg11.dtd";
|
The rationale here is not that these items will be used repetitively. In fact, they will be used only once in this program, being passed to the constructor for a DocType object. However, that statement became so cluttered when I first wrote it, I decided to break the three items out separately as shown in Listing 2 to make the code easier to understand.
Create the root node named svg
Now that we are done with the preliminaries, it is time to get serious and instantiate an Element node that represents the root node with the given name and namespace.
You learned way back in the earlier lesson titled "Java JAXP, Creating graphics using Java and SVG" (see Resources) that the root node in an SVG document must be named svg. You also learned about the namespace for the svg element in that lesson also.
Listing 3 uses typical Java syntax to instantiate a new object of type Element to serve as the root node and to set four attributes on the node as well. If you go back and compare the first statement in Listing 3 with the first statement in Listing 8 of the earlier lesson titled "Java JAXP, Creating graphics using Java and SVG" (see Resources), you will probably conclude as I have that the JDOM approach is a little more straightforward.
Listing 3. Create the root node named svg.
    Element svg = new Element("svg",ns);

    svg.setAttribute("version","1.1");
    svg.setAttribute("width","459");
    svg.setAttribute("height","459");
    svg.setAttribute("viewBox","0 0 1000 1000");
    svg.setAttribute("preserveAspectRatio","none");
|
What does the svg node represent?
The svg element represents the canvas on which various shapes can be drawn. The width and height attribute values of the svg element establish the physical size of the canvas on the screen.
|
The viewBox attribute
The values of the viewBox attribute establish the size of the canvas in "user units." The dimensions of the viewBox map directly into the dimensions of the canvas. This makes it possible for you to work in virtual dimensions that are convenient, (such as 1000x1000), instead of having to work with less convenient physical dimensions (such as 459x459). As you can see in Listing 3, the physical size of the canvas for this program is 459x459 pixels. However, as you will see later, the SVG graphics code for this program was written in terms of a virtual canvas with dimensions of 1000x1000 user units.
The preserveAspectRatio attribute
Setting the value of the preserveAspectRatio attribute to none prevents the system from attempting to automatically preserve the aspect ratio. (This, by the way, is a fairly complex SVG/XML topic.) When you set this attribute value to none, it is probably a good idea to make the ratio of the height and width of the viewBox the same as the ratio of the height and width of the physical canvas. That way, a circle will look like a circle instead of looking like an ellipse.
Create a DocType node
Listing 4 instantiates a new DocType object that represents the DTD, passing the name of the constrained element along with the public and system IDs of the DTD to the constructor.
Listing 4. Create a DocType node.
    DocType docType = new DocType(dtdConstrainedElement,
                                  dtdPublicID,
                                  dtdSystemID);
|
Create the Document node
We now have everything needed to create the Document node:
The statement in Listing 5 instantiates a new Document object for the specified root element and the specified DTD.
Listing 5. Create the Document node.
Document doc = new Document(svg,docType); |
To gain an even better appreciation as to why I prefer JDOM over Sun's JAXP DOM API, (which was used in the earlier lesson titled "Java JAXP, Creating graphics using Java and SVG" (see Resources)), compare the single statement in Listing 5 above with the first three rather convoluted statements in Listing 7 of that earlier lesson. Not only does the statement in Listing 5 replace the three statements in the previous lesson, the code in that lesson didn't even involve a DTD. Presumably it would have been even more complex if a DTD had been involved.
Create and populate a description element node
One of the element types that are allowed by the SVG DTD is a description element. Its purpose is pretty much what the name implies. The code in Listing 6:
Listing 6. Create and populate a description element node.
    Element desc = new Element("desc",ns);
    desc.setText("The basic SVG shapes.");
    svg.addContent(desc);
|
Declaring the namespace
As I explained earlier using the quotation from Elliotte Rusty Harold's book, because the root element named svg declares a namespace (see Listing 3), each child of the root node (with at least one exception) must also declare a namespace. Otherwise, the child is assigned to the following namespace:
xmlns=""
As I explained earlier, this is part of the reason for declaring a String variable with a short name containing the URI for the namespace.
Setting the text content for the element
Although I don't have an example readily available to show you, the use of the setText method to establish the text content of an element is not only completely intuitive for experienced Java programmers, it is also simpler than the required approach with Sun's JAXP DOM API.
Create a comment node
The SVG DTD also allows for standard XML comment elements to be included in the SVG/XML data. Listing 7 creates such a comment node and appends it to the root node.
Listing 7. Create a comment node.
    Comment comment = new Comment(
                             " Show outline of canvas. ");
    svg.addContent(comment);
|
Note that this is the one case that I have identified where it is not necessary to declare the namespace to create the node.
Now do some graphics programming
The next seven elements that will be created are SVG graphics elements. It is very important to note that they are specified using virtual viewBox dimensions rather than physical canvas dimensions.
Create the rectangular border
Listing 8 instantiates an element node of type rect that represents the black rectangular border for the canvas shown in Figure 1. Listing 8 also appends the node to the root.
Listing 8. Create the rectangular border.
    Element rectA = new Element("rect",ns);

    rectA.setAttribute("x","1");
    rectA.setAttribute("y","1");
    rectA.setAttribute("width","999");
    rectA.setAttribute("height","999");
    rectA.setAttribute("fill","none");
    rectA.setAttribute("stroke","black");
    rectA.setAttribute("stroke-width","20");

    svg.addContent(rectA);
|
The stroke-width attribute
Although the stroke-width is set to 20, the width of the border in Figure 1 appears to be only about 10 (as compared to the red border on the yellow rectangle, which has a width of 10). This is because when the stroke width is greater than 1, half of the width falls on one side of the stroke and the other half falls on the other side of the stroke. Therefore, half of the stroke width in this case is outside the bounds of the canvas and therefore isn't visible in the drawing.
A fill attribute value of none
In case I haven't mentioned it before, setting the fill to none essentially causes the shape to be transparent except for the stroke that outlines the shape.
Otherwise, I would hope that from what you have learned in earlier lessons, everything is Listing 8 is straightforward and shouldn't require further explanation.
Lots of code for a single rectangular shape
By now, you may have concluded that having to write nine different statements to draw this rectangle is a lot of work. That is the issue that I will tackle in the program named Svg16, where I will develop a JDOM graphics library to greatly reduce the required programming effort. Before getting to that, however, I want to make certain that you know how to create SVG graphics using raw JDOM code so that you will understand the structure of the library.
A yellow rectangle with a red border
Listing 9 instantiates a node that represents the rectangle with a yellow fill and a red border with a width of 10 shown in Figure 1. Listing 9 also appends the node to the root. As you can see in Figure 1, this rectangle is centered in the canvas on the basis of virtual viewBox dimensions.
Listing 9. Create a yellow rectangle with a red border.
    Element rectB = new Element("rect",ns);
    rectB.setAttribute("x","299");
    rectB.setAttribute("y","399");
    rectB.setAttribute("width","400");
    rectB.setAttribute("height","200");
    rectB.setAttribute("fill","yellow");
    rectB.setAttribute("stroke","red");
    rectB.setAttribute("stroke-width","10");
    svg.addContent(rectB);
|
The remaining graphics elements
The code in Listing 10 creates the remaining five graphics elements shown in Figure 1. The pattern is pretty much the same from one graphic element to the next. Therefore, no explanation beyond the embedded comments should be needed.
Listing 10. The remaining graphics elements.
    //Instantiate a node that represents an ellipse that
    // just fits inside the borders of the yellow
    // rectangle and append it to the root.
    Element ellipse = new Element("ellipse",ns);
    ellipse.setAttribute("cx","499");
    ellipse.setAttribute("cy","499");
    ellipse.setAttribute("rx","195");
    ellipse.setAttribute("ry","95");
    ellipse.setAttribute("fill","none");
    ellipse.setAttribute("stroke","black");
    ellipse.setAttribute("stroke-width","1");
    svg.addContent(ellipse);

    //Instantiate a node that represents a polyline with
    // three points and append it to the root.  This
    // polyline forms an open triangular shape in the
    // upper half of the canvas.
    Element polyline = new Element("polyline",ns);
    polyline.setAttribute("points",
         "449,200, 499,100 549,200");
    polyline.setAttribute("fill","none");
    polyline.setAttribute("stroke","black");
    polyline.setAttribute("stroke-width","1");
    svg.addContent(polyline);

    //Instantiate a node that represents a polygon with
    // three points and append it to the root. This
    // polygon forms a closed triangle in the lower half
    // of the canvas.
    Element polygon = new Element("polygon",ns);
    polygon.setAttribute("points",
         "449,800, 499,900 549,800");
    polygon.setAttribute("fill","none");
    polygon.setAttribute("stroke","black");
    polygon.setAttribute("stroke-width","1");
    svg.addContent(polygon);

    //Instantiate a node that represents a black line
    // that extends from the upper left corner of the
    // canvas to the lower right corner of the canvas.
    // Append it to the root.
    Element line = new Element("line",ns);
    line.setAttribute("x1","0");
    line.setAttribute("y1","0");
    line.setAttribute("x2","999");
    line.setAttribute("y2","999");
    line.setAttribute("stroke","black");
    line.setAttribute("stroke-width","1");
    svg.addContent(line);

    //Instantiate a node that represents a black circle
    // that just fits inside the canvas. Note that it
    // overlaps the border on the canvas. Append the node
    // to the root.
    Element circle = new Element("circle",ns);
    circle.setAttribute("cx","499");
    circle.setAttribute("cy","499");
    circle.setAttribute("r","499");
    circle.setAttribute("stroke","black");
    circle.setAttribute("stroke-width","1");
    circle.setAttribute("fill","none");
    svg.addContent(circle);
|
Write the output file
Listing 11 calls the writePrettyFile method to write an output file containing the SVG/XML code to an SVG file. I will explain that method shortly.
Listing 11. Write the output file.
    writePrettyFile("Svg15.svg",doc);
//    writeCompactFile("Svg15.svg",doc);

  }//end main
|
In addition to the method named writePrettyFile, I also provided another method named writeCompactFile. You can enable one or the other of the two method calls in Listing 11 to select between a pretty-print format and a compact format.
The compact format is more efficient than the pretty-print format and is probably what you should normally use. However, the pretty-print format is very useful during test and debugging because you can view the source in your browser and the XML code will be reasonably well formatted.
End of the main method
Listing 11 also signals the end of the main method and the end of the program.
The writePrettyFile method
The writePrettyFile method that was called in Listing 11 is shown in its entirety in Listing 12. As you can see, the method receives a String that specifies the file name along with a reference to the Document object as incoming parameters.
Listing 12. The writePrettyFile method.
  private static void writePrettyFile(
                              String fname, Document doc){
    try{
      FileOutputStream out = new FileOutputStream(fname);

      XMLOutputter xmlOut =
               new XMLOutputter(Format.getPrettyFormat());
      xmlOut.output(doc,out);

      out.flush();
      out.close();
    }catch (IOException e){
      System.err.println(e);
    }//end catch
  }//end writePrettyFile
|
|
Another comparison with Sun's JAXP DOM API
For an extreme comparison with Sun's JAXP DOM API, compare the two boldface statements in Listing 12 above with six of the very convoluted statements in Listing 15 of the earlier lesson titled "Java JAXP, Creating graphics using Java and SVG" (see Resources). While some of the statements in that listing produce screen output, six of those statements are required to transform the DOM tree into SVG/XML code write an output file containing that code.
The final SVG/XML code
In case you are interested, the SVG/XML code produced by this program is shown in Listing 13.
Listing 13. The final SVG/XML code for the program named Svg15.
<?xml version="1.0" encoding="UTF-8"?> <!DOCTYPE svg PUBLIC "-//W3C//DTD SVG 1.1//EN" "http://www.w3.org/Graphics/SVG/1.1/DTD/svg11.dtd"> <svg xmlns="http://www.w3.org/2000/svg" version="1.1" width="459" height="459" viewBox="0 0 1000 1000" preserveAspectRatio="none"> <desc>The basic SVG shapes.</desc> <!-- Show outline of canvas. --> <rect x="1" y="1" width="999" height="999" fill="none" stroke="black" stroke-width="20" /> <rect x="299" y="399" width="400" height="200" fill="yellow" stroke="red" stroke-width="10" /> <ellipse cx="499" cy="499" rx="195" ry="95" fill="none" stroke="black" stroke-width="1" /> <polyline points="449,200, 499,100 549,200" fill="none" stroke="black" stroke-width="1" /> <polygon points="449,800, 499,900 549,800" fill="none" stroke="black" stroke-width="1" /> <line x1="0" y1="0" x2="999" y2="999" stroke="black" stroke-width="1" /> <circle cx="499" cy="499" r="499" stroke="black" stroke-width="1" fill="none" /> </svg> |
Note that the pretty-print output was much too wide to fit in this narrow publication format. Therefore, it was necessary for me to manually insert line breaks into Listing 13 to force it to fit.
Also note that I highlighted some items of interest using boldface in Listing 13. You should be able to directly correlate the SVG/XML code in Listing 13 with the statements in the program named Svg15.
Program description
This program is an update of the program named Svg15. The purpose of this update is begin the development and use of a Java/JDOM/SVG graphics library designed to eliminate much of the work involved in writing Java programs to produce SVG files.
This program uses JDOM 1.0 and an SVG graphics library class of my own design named JdomSvg to create an XML file named Svg16.svg That file draws at least one of each of the following six basic SVG shapes when rendered in an SVG graphics engine such as Firefox 2.0.0.4:
The graphic output is identical to that produced by the program named Svg15, and is shown in Figure 1.
The preliminary stuff
The beginning of the class and the beginning of the main method is shown in Listing 14.
Listing 14. The preliminary stuff for Svg16.
public class Svg16{

  public static void main(String[] args){
    //Create a String variable containing the namespace
    // URI to reduce the amount of typing that is required
    // later. Note that the variable name is short and
    // easy to type.
    String ns = "http://www.w3.org/2000/svg";

    //For clarity, create strings containing the name of
    // the element that is constrained by the DTD (the
    // root element), the Public ID of the DTD, and the
    // System ID of the DTD.
    String dtdConstrainedElement = "svg";
    String dtdPublicID = "-//W3C//DTD SVG 1.1//EN";
    String dtdSystemID =
       "http://www.w3.org/Graphics/SVG/1.1/DTD/svg11.dtd";
|
The code in Listing 14 is the same as the code in the program named Svg15, and therefore shouldn't require an explanation beyond the embedded comments.
Comments deleted from the main method
Note that the code in the main method of this program replicates the behavior of the main method in the program named Svg15. From this point forward, most of the explanatory comments have been removed from the main method for brevity. See the comments in the program named Svg15 for an explanation of the behavior of this program.
The class named JdomSvg
Putting the main method aside for the moment, I want to introduce you to the class named JdomSvg. This class contains a Java/JDOM/SVG graphics library of my own design that is designed to reduce the amount of work required to use JDOM to create SVG output.
The library contains individual static methods that are used to construct and return many of the standard SVG graphics elements. Many of the methods have default attribute values. If you need different attribute values for a particular graphic element, you can call the setAttribute method on the returned value to change the attribute values after the method returns.
Also, many of the methods set the stroke attribute value to black and set the stroke-width attribute value to 1. If you don't want to be able to see the outline of the shape, change the stroke-width attribute value to 0 after the method returns.
As this discussion progresses, I will be switching back and forth between statements in the main method and the methods in the library that are called by the statements in the main method. Each time I return to the main method, I will insert a Java comment in the upper left corner of the listing indicating that the code in that listing comes from the main method.
Create and save the root node named svg
Listing 15 calls the makeSvg method of the JdomSvg class to construct and return a root node named svg.
Listing 15. Create and save the root node named svg.
//In main
    Element svg = JdomSvg.makeSvg(ns,459,459,1000,1000);
|
Compare the code in Listing 15 with the raw JDOM code in Listing 3.
The first parameter that is passed to the method in Listing 15 is a reference to the namespace string. The remaining four parameters correspond to the values of four of the attributes shown in Listing 3. Obviously the single statement in Listing 15 requires a lot less work to write than the six individual statements in Listing 3.
The makeSvg method
The makeSvg method begins in Listing 16. This method constructs and returns a reference to an SVG root element node named svg.
Listing 16. The makeSvg method.
  public static Element makeSvg(
                      String ns,//namespace URI
                      int svgWidth,//width of the canvas
                      int svgHeight,//height of the canvas
                      int vbWidth,//width of the viewBox
                      int vbHeight//height of the viewBox
                      ){
    Element svg = new Element("svg",ns);
|
The comments associated with the formal arguments in the method signature should make the purpose of each argument clear.
The first executable statement inside the method in Listing 16 instantiates the new Element object of type svg declaring the namespace to which it belongs.
Default attribute values
By default, the min-x and min-y attribute values of the viewBox are set to 0 0. Those are the coordinates of the upper left corner of the viewbox.
Also by default, the value of the preserveAspectRatio attribute is set to none.
Physical versus virtual size of the canvas
Recall that the svg element represents the canvas on which various shapes can be drawn. The width and height attribute values of the svg element establish the physical size of the canvas on the screen. The values of the viewBox attribute establish the virtual size of the canvas in "user units."
The dimensions of the viewBox map directly into the dimensions of the canvas. This makes it possible for you to work in virtual dimensions that are convenient, (such as 1000x1000), instead of having to work with less convenient physical dimensions of the canvas (such as 459x459).
Aspect ratio
Also recall that setting the value of the preserveAspectRatio attribute to none prevents the system from attempting to automatically preserve the aspect ratio. In this case, it is probably a good idea for you to make the ratio of the height and width of the viewBox the same as the ratio of the height and width of the canvas. That way, a circle will look like a circle instead of looking like an ellipse. Note, however, that in some cases, such as the plotting of curves in an x-y coordinate system, that may not be preferable.
Set default attribute values
Listing 17 sets the default attribute values as described above.
Listing 17. Set default attribute values for the makeSvg method.
    svg.setAttribute("version","1.1");
    svg.setAttribute("preserveAspectRatio","none");
    String vbMinX = "0 ";
    String vbMinY = "0 ";
|
Set user specified attribute values
Listing 18 sets the user specified attribute values on the basis of the incoming parameter values.
Listing 18. Set user specified attribute values for the makeSvg method.
    svg.setAttribute("width",""+svgWidth);
    svg.setAttribute("height",""+svgHeight);
    svg.setAttribute("viewBox",
             vbMinX + vbMinY + ""+vbWidth + " "+vbHeight);

    return svg;
  }//end makeSvg
|
Note the format that is required to construct the attribute value for the viewBox attribute. If you need to call the setAttribute method after this method returns to change the attribute value for the viewBox attribute, you will need to comply with the format requirements for that value. Also note that the first two components of the viewBox attribute value were set as default values in Listing 17.
Explanation of a peculiar syntax
Note the syntax of the second parameter to the setAttribute method for the width attribute. At first, this syntax may look a little strange. You will see it used throughout this graphics library.
In this case, as in many others, the setAttribute method requires that an integer numeric value be passed to the method as a String object. However, in Listing 15, it is much quicker for you to pass integer numeric parameters to the makeSvg method without the requirements to type the quotation marks to convert them to type String. Also, the values will often be produced by the evaluation of a numeric computational expression.
The syntax used for the second parameter to the setAttribute method for the width attribute is simply a "quick and dirty" way to convert a value of type int to a String object. It works because of the concatenation and coercion rules associated with String objects.
End of the method
Listing 18 also signals the end of the makeSvg method.
Create a DocType and a Document
The code in Listing 19 is the same as the code in the program named Svg15, but without the explanatory comments.
Listing 19. Create a DocType and a Document.
//In main
    DocType docType = new DocType(
           dtdConstrainedElement,dtdPublicID,dtdSystemID);

    Document doc = new Document(svg,docType);
|
Create a description element
Listing 20 calls the makeDescription method to create a desc element and to make it a child of the svg element. Compare the statement in Listing 20 with the code in Listing 6.
Listing 20. Create a description element.
//In main
    JdomSvg.makeDescription(
                          svg,ns,"The basic SVG shapes.");
|
|
The makeDescription method
The makeDescription method is shown in its entirety in Listing 21.
Listing 21. The makeDescription method.
  public static Element makeDescription(
              Element parent,//The parent of this element.
              String nameSpace,//The namespace.
              String text//Text content for this element.
              ){
    Element desc = new Element("desc",nameSpace);
    parent.addContent(desc);
    desc.setText(text);

    return desc;
  }//end makeDescription
|
This method constructs and returns a desc node for a given namespace and a given parent. As is the case for many of the methods in the library, it also adds the new node to the parent causing it to become a child of the parent. It also populates the new node with the incoming text string in the third parameter.
Create a comment element
The code in Listing 22 creates a comment element and attaches it as a child to the svg element.
Listing 22. Create a comment element.
//In main.
    JdomSvg.makeComment(svg," Show outline of canvas. ");
|
Note that the parameter list for the makeComment method doesn't require a reference to the namespace URI string as discussed earlier in this lesson.
The code in the makeComment method is so straightforward that I'm not going to bore you by breaking it out into a separate listing. You can view the method in its entirety in Listing 33 near the end of the lesson.
Make the border for the canvas
The code in Listing 23 calls the makeRect method to construct the black border for the canvas shown in Figure 1. Compare the two statements in Listing 23 with the nine statements that were required in Listing 8 to accomplish the same thing.
Listing 23. Make the border for the canvas.
//In main.
    Element rectA = JdomSvg.makeRect(svg,ns,1,1,999,999);
    rectA.setAttribute("stroke-width","20");
|
As you will see shortly, the makeRect method sets the stroke to black with a stroke-width of 1. In this case, I needed a stroke-width value of 20, so I called the setAttribute method after the makeRect method returned to change the width from the default value of 1 to a new value of 20.
The makeRect method
The makeRect method is shown in its entirety in Listing 24.
Listing 24. The makeRect method.
  public static Element makeRect(
                  Element parent,
                  String namespace,
                  int x,//Coordinate of upper-left corner.
                  int y,//Coordinate of upper-left corner.
                  int width,
                  int height
                  ){
    Element rect = new Element("rect",namespace);
    parent.addContent(rect);

    //Set default attribute values.
    rect.setAttribute("fill","none");
    rect.setAttribute("stroke","black");
    rect.setAttribute("stroke-width","1");

    //Set user specified attribute values.
    rect.setAttribute("x",""+x);
    rect.setAttribute("y",""+y);
    rect.setAttribute("width",""+width);
    rect.setAttribute("height",""+height);

    return rect;
  }//end makeRect
|
This method constructs and returns a rect node for a given parent in a given namespace. By default, the stroke is black, the stroke-width is 1, and the fill is none. In addition to constructing the node, the method also attaches the node as a child of the specified parent.
A typical structure
The general structure of the makeRect method in Listing 24 is typical of many of the methods in the graphic library. The method begins by constructing the new node and attaching it as a child of the specified parent node.
Then it calls the setAttribute method several times in succession to set the default values for those attributes that get default values. Follow that, it calls the setAttribute method several more times in succession to set the user specified attribute values based on the incoming parameter values.
Create the yellow rectangle
Listing 25 calls the makeRect method again to create the code for the yellow rectangle with the red border shown in the center of Figure 1.
Listing 25. Create the yellow rectangle.
//In main.
    Element rectB = JdomSvg.makeRect(
                                  svg,ns,299,399,400,200);
    rectB.setAttribute("fill","yellow");
    rectB.setAttribute("stroke","red");
    rectB.setAttribute("stroke-width","10");
|
In this case, I needed values for three attributes that were different from the default values for those attributes provided by the makeRect method. Therefore, I called the setAttribute method three times in succession after the makeRect method returned to change the attribute values from their default values to the desired values.
Create the ellipse node
Listing 26 calls the makeEllipse method to create the ellipse that is shown inside the red rectangle in Figure 1. Compare this statement with the first nine statements in Listing 10 that accomplish the same thing.
Listing 26. Create the ellipse node.
//In main.
    JdomSvg.makeEllipse(svg,ns,499,499,195,95);
|
The code in the makeEllipse method fits the general structure described above and is completely straightforward. Therefore, it shouldn't require an explanation beyond the embedded comments. You can view the method in its entirety in Listing 33 near the end of the lesson.
Draw the polyline
Listing 27 calls the makePolyline method to draw the open triangular shape near the top of Figure 1
Compare this statement with six statements in Listing 10 that accomplish the same thing.
Listing 27. Draw the polyline.
//In main.
    JdomSvg.makePolyline(svg,ns,
                      new int[]{449,200,499,100,549,200});
|
This method is a little different from most of the other methods in the graphic library. In particular, in order to draw a polyline, you must specify the coordinates for every point in the polyline. As you can see, the method call in Listing 27 constructs and passes a reference to an array object containing coordinate pairs of integer data as the third parameter.
The makePolyline method
The makePolyline method is shown in its entirety in Listing 28.
Listing 28. The makePolyline method.
  static Element makePolyline(Element parent,
                              String namespace,
                              int[] points){//See above.
    Element polyline = new Element("polyline",namespace);
    parent.addContent(polyline);

    //Set default attributes
    polyline.setAttribute("stroke","black");
    polyline.setAttribute("stroke-width","1");
    polyline.setAttribute("fill","none");

    //Set user specified attributes.
    String dataPoints = "";
    for(int cnt=0;cnt<points.length;cnt++){
      dataPoints += "" + points[cnt] + " ";
    }//end for loop
    polyline.setAttribute("points",dataPoints);

    return polyline;
  }//end makePolyline
|
The makePolyline method constructs and returns a polyline node for a given parent in a given namespace. It also attaches the node as a child of the specified parent node.
The incoming array of type int[], which contains the coordinates for each point in the polyline, must contain an even number of values for the polyline to be drawn correctly. Otherwise, the polyline simply won't be drawn.
The values are extracted from the array and treated as coordinate values x1,y1, x2,y2, x3,y3 ...etc.
By default, the stroke is set to black one pixel wide with no fill.
Similar to a polygon
The main difference between a polyline and a polygon (see below) is that a polygon is automatically closed by connecting the last point to the first point when it is drawn. While you may choose to close a polyline if you cause the coordinates of the last point to match the coordinates of the first point, it is not automatically closed as in the case of a polygon.
Be careful if you fill a polyline that is not closed. The results may not be what you expect to see.
Create the polygon
Listing 29 calls the makePolygon method to draw the triangle near the bottom of Figure 1.
Listing 29. Create the polygon.
//In main.
    JdomSvg.makePolygon(svg,ns,
                      new int[]{449,800,499,900,549,800});
|
As is the case for the makePolyline method, the makePolygon method expects to receive a reference to an array object containing integer coordinate values as the third parameter.
The makePolygon method is very similar to the makePolyline method and shouldn't require an explanation beyond the embedded comments in the method. You can view the method in its entirety in Listing 33 near the end of the lesson.
Create the diagonal line and the circle
Listing 30 calls the two boldface methods in Listing 30 to draw the diagonal line and the circle in Figure 1.
Listing 30. Create the diagonal line and the circle.
//In main.
    JdomSvg.makeLine(svg,ns,0,0,999,999);

    JdomSvg.makeCircle(svg,ns,499,499,499);
|
The makeLine method and the makeCircle method are both very similar to the typical makeRect method discussed in Listing 24. There is nothing unusual about either method, so they shouldn't require any explanation beyond the embedded comments. You can view both methods in their entirety in Listing 33 near the end of the lesson.
No more graphics elements
That covers all of the graphics elements shown in Figure 1. All that remains is to transform the JDOM tree to raw SVG/XML code and write it into the output file. This is accomplished by the code in Listing 31.
Write the output file
Listing 31 calls either the writePrettyFile method or the writeCompactFile method (depending on which statement is enabled) to write the output file.
Listing 31. Write the output file.
//In main.
    JdomSvg.writePrettyFile("Svg16.svg",doc);
    //JdomSvg.writeCompactFile("Svg16.svg",doc);

  }//end main
|
These two methods are identical to the code that I explained in Listing 12. I simply moved them into the graphics library class named JdomSvg and made them static. You can view both of the methods in Listing 33 near the end of the lesson.
End of the program
Listing 31 also signals the end of the main method and the end of the program.
I encourage you to download and install the JDOM API as described earlier. Then copy the code from Listing 32 and Listing 33 into your text editor. Compile the code and execute it. View the output files in an SVG graphics engine such as Firefox 2.0.0.4. Experiment with the code, making changes, and observing the results of your changes.
Above all, enjoy the process. Programming, particularly graphics programming, can be fun if you approach it with a positive attitude.
In this lesson, I taught you a little about JDOM as an alternative to Sun's JAXP DOM API. I taught you how to create an SVG file using raw JDOM commands. I also taught you how to write a Java/JDOM/SVG graphics library to reduce the effort required to create SVG files using JDOM and Java.
In Part 2 of this tutorial, I will:
Links to all tutorial lessons at DickBaldwin.com
Java 2D Graphics
300 Java 2D Graphics,
Nested Top-Level Classes and Interfaces
302 Java 2D Graphics,
The Point2D Class
304 Java 2D Graphics,
The Graphics2D Class
306 Java 2D Graphics,
Simple Affine Transforms
308 Java 2D Graphics,
The Shape Interface, Part 1
310 Java 2D Graphics,
The Shape Interface, Part 2
312 Java 2D Graphics,
Solid Color Fill
314 Java 2D Graphics,
Gradient Color Fill
316 Java 2D Graphics,
Texture Fill
318 Java 2D Graphics,
The Stroke Interface
320 Java 2D Graphics,
The Composite Interface and Transparency
322 Java 2D Graphics,
The Composite Interface, GradientPaint, and Transparency
324 Java 2D Graphics,
The Color Constructors and Transparency
Java 2D API
Specification
Java 2D API
Java API for XML Processing (JAXP)
2200 Java API for
XML Processing (JAXP), Getting Started
2202 Getting
Started with Java JAXP and XSL Transformations (XSLT)
2204 Java
JAXP, Exposing a DOM Tree
2206 Java
JAXP, Implementing Default XSLT Behavior in Java
2208 Java
JAXP, Writing Java Code to Emulate an XSLT Transformation
2210 Java
JAXP, Transforming XML to XHTML
Links to numerous XML tutorials
by Richard G. Baldwin
Scalable Vector Graphics (SVG)
2212 Java
JAXP, Creating graphics using Java and SVG
2214 An
improved approach for creating SVG/XML code and SVG/XML DOM nodes using Java
2216 Using
Java to produce SVG code in XHTML data
2218 Writing
Java servlets to produce XHTML code that references external SVG files
2220 Drawing grids, Bézier curves and elliptical arcs using Java and SVG
Scalable Vector Graphics (SVG) 1.1
Specification
Adobe SVG Viewer plug-in
Create vector graphics in the browser with SVG by Uche Ogbuji
SVG Tutorial
SVG Basics
SVG in HTML
pages
Bézier Curves
What's a
Bézier Curve?
Wikipedia, Bézier curve
Bézier Curve
Demo
Miscellaneous
W3C Markup Validation
Service
XMLvalidation.com
Reflection in
a Line
An Intuitive
Notion of Line Reflections
JDOM
JDOM Main Page
Simplify
XML programming with JDOM
Interactive Java &
JDOM Online Tutorial
Easy
Java/XML integration with JDOM
Wikipedia, JDOM
Chapter
14 (JDOM) of Elliotte Rusty Harold's book, Processing XML with Java
Chapter 15 (The JDOM Model) of Elliotte Rusty Harold's book, Processing
XML with Java.
Listing 32. Java program code for Svg15.
/*File Svg15.java,
Copyright 2007, R.G.Baldwin

This is my first published Java/JDOM/SVG program.

This program uses JDOM 1.0 to create an XML file named
Svg15.svg that draws at least one of each of the
following six basic SVG shapes when rendered in an SVG
graphics engine such as Firefox 2.0.0.4:

    * rectangle
    * circle
    * ellipse
    * line
    * polyline
    * polygon


The main purpose is to illustrate how to create an SVG
file using raw JDOM commands. A later program will show
how to write a Java/JDOM/SVG graphics library that
eliminates much of the pain of programming using raw
JDOM commands.

A secondary purpose is to illustrate the use of a viewBox
element to make it possible for the programmer to work
in terms of convenient canvas dimensions, such as
1000x1000 instead of having to work in less convenient
dimensions such as 459x459.

The file validates at: http://validator.w3.org/

Tested using J2SE 6.0, JDOM 1.0, and Firefox 2.0.0.4
running under WinXP.
*********************************************************/
import java.io.*;
import org.jdom.*;
import org.jdom.output.XMLOutputter;
import org.jdom.output.Format;
public class Svg15{

  public static void main(String[] args){
    //Create a String variable containing the namespace
    // URI to reduce the amount of typing that is required
    // later. Note that the variable name is short and
    // easy to type.
    String ns = "http://www.w3.org/2000/svg";

    //For clarity, create strings containing the name of
    // the element that is constrained by the DTD (the
    // root element), the Public ID of the DTD, and the
    // System ID of the DTD.
    String dtdConstrainedElement = "svg";
    String dtdPublicID = "-//W3C//DTD SVG 1.1//EN";
    String dtdSystemID =
       "http://www.w3.org/Graphics/SVG/1.1/DTD/svg11.dtd";

    //Instantiate an Element node that represents the
    // root node with the given name and namespace. Set
    // four attributes on the node.
    //The svg element represents the canvas on which
    // various shapes can be drawn. The width and height
    // attribute values of the svg element establish the
    // physical size of the canvas on the screen. The
    // values of the viewBox attribute establish the
    // size of the canvas in "user units."  The
    // dimensions of the viewbox map directly into the
    // dimensions of the canvas.  This makes it possible
    // for the programmer to work in dimensions that are
    // convenient, such as 1000x1000, instead of having
    // to work with less convenient dimensions such as
    // 459x459.
    //Setting the value of the preserveAspectRatio
    // attribute to none prevents the system from
    // attempting to automatically preserve the aspect
    // ratio.  In this case, it is probably a good idea
    // for the programmer to make the ratio of the height
    // and width of the viewbox the same as the ratio of
    // the height and width of the canvas. That way, a
    // circle will look like a circle instead of looking
    // like an ellipse.
    Element svg = new Element("svg",ns);
    svg.setAttribute("version","1.1");
    svg.setAttribute("width","459");
    svg.setAttribute("height","459");
    svg.setAttribute("viewBox","0 0 1000 1000");
    svg.setAttribute("preserveAspectRatio","none");

    //Instantiate a new DocType object that represents the
    // DTD, passing the name of the constrained element
    // along with the public and system IDs of the DTD to
    // the constructor.
    DocType docType = new DocType(dtdConstrainedElement,
                                  dtdPublicID,
                                  dtdSystemID);

    //Instantiate a new Document for the specified root
    // element and the specified DTD.
    Document doc = new Document(svg,docType);

    //Instantiate a description element. Set it's text
    // value, and append it to the root. Note that because
    // the root declares a namespace, each child of the
    // root node must declare a namespace.  Otherwise, the
    // child is assigned to xmlns="". This is part of the
    // reason for declaring a String variable with a short
    // name containing the URI for the namespace earlier.
    Element desc = new Element("desc",ns);
    desc.setText("The basic SVG shapes.");
    svg.addContent(desc);

    //Instantiate a comment node and append it to the
    // root node.  Note that no namespace is required
    // here.
    Comment comment = new Comment(
                             " Show outline of canvas. ");
    svg.addContent(comment);

    //The next seven elements are SVG elements. Note that
    // they are drawn using viewBox dimensions rather
    // than physical screen dimensions.

    //Instantiate a node that represents a black
    // rectangular border for the canvas and append it to
    // the root.  Although the stroke-width is set to 20,
    // the width of the border appears to be only about
    // 10, because the other half of the border is
    // outside the bounds of the canvas.
    Element rectA = new Element("rect",ns);
    rectA.setAttribute("x","1");
    rectA.setAttribute("y","1");
    rectA.setAttribute("width","999");
    rectA.setAttribute("height","999");
    rectA.setAttribute("fill","none");
    rectA.setAttribute("stroke","black");
    rectA.setAttribute("stroke-width","20");
    svg.addContent(rectA);

    //Instantiate a node that represents a rectangle with
    // a yellow fill and a red border with a width of
    // 10.  Append it to the root. This rectangle is
    // centered in the canvas.
    Element rectB = new Element("rect",ns);
    rectB.setAttribute("x","299");
    rectB.setAttribute("y","399");
    rectB.setAttribute("width","400");
    rectB.setAttribute("height","200");
    rectB.setAttribute("fill","yellow");
    rectB.setAttribute("stroke","red");
    rectB.setAttribute("stroke-width","10");
    svg.addContent(rectB);

    //Instantiate a node that represents an ellipse that
    // just fits inside the borders of the yellow
    // rectangle and append it to the root.
    Element ellipse = new Element("ellipse",ns);
    ellipse.setAttribute("cx","499");
    ellipse.setAttribute("cy","499");
    ellipse.setAttribute("rx","195");
    ellipse.setAttribute("ry","95");
    ellipse.setAttribute("fill","none");
    ellipse.setAttribute("stroke","black");
    ellipse.setAttribute("stroke-width","1");
    svg.addContent(ellipse);

    //Instantiate a node that represents a polyline with
    // three points and append it to the root.  This
    // polyline forms an open triangular shape in the
    // upper half of the canvas.
    Element polyline = new Element("polyline",ns);
    polyline.setAttribute("points",
         "449,200, 499,100 549,200");
    polyline.setAttribute("fill","none");
    polyline.setAttribute("stroke","black");
    polyline.setAttribute("stroke-width","1");
    svg.addContent(polyline);

    //Instantiate a node that represents a polygon with
    // three points and append it to the root. This
    // polygon forms a closed triangle in the lower half
    // of the canvas.
    Element polygon = new Element("polygon",ns);
    polygon.setAttribute("points",
         "449,800, 499,900 549,800");
    polygon.setAttribute("fill","none");
    polygon.setAttribute("stroke","black");
    polygon.setAttribute("stroke-width","1");
    svg.addContent(polygon);

    //Instantiate a node that represents a black line
    // that extends from the upper left corner of the
    // canvas to the lower right corner of the canvas.
    // Append it to the root.
    Element line = new Element("line",ns);
    line.setAttribute("x1","0");
    line.setAttribute("y1","0");
    line.setAttribute("x2","999");
    line.setAttribute("y2","999");
    line.setAttribute("stroke","black");
    line.setAttribute("stroke-width","1");
    svg.addContent(line);

    //Instantiate a node that represents a black circle
    // that just fits inside the canvas. Note that it
    // overlaps the border on the canvas. Append the node
    // to the root.
    Element circle = new Element("circle",ns);
    circle.setAttribute("cx","499");
    circle.setAttribute("cy","499");
    circle.setAttribute("r","499");
    circle.setAttribute("stroke","black");
    circle.setAttribute("stroke-width","1");
    circle.setAttribute("fill","none");
    svg.addContent(circle);


    //Write the SVG/XML code to an SVG file. Enable and
    // disable one or the other of the following two
    // method calls to select between a pretty-print
    // format and a compact format. The pretty-print file
    // is less efficient than the compact file, but it
    // is very useful during test and debugging because
    // you can view source in your browser and the XML
    // code will be reasonably well formatted.
    writePrettyFile("Svg15.svg",doc);
//    writeCompactFile("Svg15.svg",doc);

  }//end main
  //----------------------------------------------------//

  //This method writes the XML code into an output file
  // in pretty-print format
  private static void writePrettyFile(
                              String fname, Document doc){
    try{
      FileOutputStream out = new FileOutputStream(fname);

      XMLOutputter xmlOut =
               new XMLOutputter(Format.getPrettyFormat());
      xmlOut.output(doc,out);

      out.flush();
      out.close();
    }catch (IOException e){
      System.err.println(e);
    }//end catch
  }//end writePrettyFile
  //----------------------------------------------------//

  //This method writes the XML code into an output file
  // in whitespace-normalized format
  private static void writeCompactFile(
                              String fname, Document doc){
    try{
      FileOutputStream out = new FileOutputStream(fname);

      XMLOutputter xmlOut =
              new XMLOutputter(Format.getCompactFormat());
      xmlOut.output(doc,out);

      out.flush();
      out.close();
    }catch (IOException e){
      System.err.println(e);
    }//end catch
  }//end writePrettyFile
  //----------------------------------------------------//

}//end class Svg15
//======================================================//
|
Listing 33. Java program code for Svg16.
/*File Svg16.java,
Copyright 2007, R.G.Baldwin

This program is an update of the program named Svg15.
The purpose of this update is begin the development and
use of a Java/JDOM/SVG graphics library designed to
eliminate much of the pain involved in writing Java
programs to produce SVG files.

This program uses JDOM 1.0 and an SVG graphics library
class of my own design named JdomSvg to create an XML
file named Svg16.svg that draws at least one of each of
the following six basic SVG shapes when rendered in an
SVG graphics engine such as Firefox 2.0.0.4:

    * rectangle
    * circle
    * ellipse
    * line
    * polyline
    * polygon


The main purpose is to illustrate how to create an SVG
file using the JDOM SVG graphics library.

A secondary purpose is to illustrate the use of a viewBox
element to make it possible for the programmer to work
in terms of convenient canvas dimensions, such as
1000x1000 instead of having to work in less convenient
dimensions such as 459x459.

The file validates at: http://validator.w3.org/

Tested using J2SE 6.0, JDOM 1.0, and Firefox 2.0.0.4
running under WinXP.
*********************************************************/
import java.io.*;
import org.jdom.*;
import org.jdom.output.XMLOutputter;
import org.jdom.output.Format;
public class Svg16{

  public static void main(String[] args){
    //Create a String variable containing the namespace
    // URI to reduce the amount of typing that is required
    // later. Note that the variable name is short and
    // easy to type.
    String ns = "http://www.w3.org/2000/svg";

    //For clarity, create strings containing the name of
    // the element that is constrained by the DTD (the
    // root element), the Public ID of the DTD, and the
    // System ID of the DTD.
    String dtdConstrainedElement = "svg";
    String dtdPublicID = "-//W3C//DTD SVG 1.1//EN";
    String dtdSystemID =
       "http://www.w3.org/Graphics/SVG/1.1/DTD/svg11.dtd";

    //Note that the code in the main method of this
    // program replicates the behavior of the main method
    // in the program named Svg15.  From this point
    // forward, most of the explanatory comments have been
    // removed for brevity.  See the comments in the
    // program named Svg15 for an explanation of the
    // behavior of this program.

    Element svg = JdomSvg.makeSvg(ns,459,459,1000,1000);

    DocType docType = new DocType(
           dtdConstrainedElement,dtdPublicID,dtdSystemID);

    Document doc = new Document(svg,docType);

    JdomSvg.makeDescription(
                          svg,ns,"The basic SVG shapes.");

    JdomSvg.makeComment(svg," Show outline of canvas. ");

    Element rectA = JdomSvg.makeRect(svg,ns,1,1,999,999);
    rectA.setAttribute("stroke-width","20");

    Element rectB = JdomSvg.makeRect(
                                  svg,ns,299,399,400,200);
    rectB.setAttribute("fill","yellow");
    rectB.setAttribute("stroke","red");
    rectB.setAttribute("stroke-width","10");

    JdomSvg.makeEllipse(svg,ns,499,499,195,95);

    JdomSvg.makePolyline(svg,ns,
                      new int[]{449,200,499,100,549,200});

    JdomSvg.makePolygon(svg,ns,
                      new int[]{449,800,499,900,549,800});

    JdomSvg.makeLine(svg,ns,0,0,999,999);

    JdomSvg.makeCircle(svg,ns,499,499,499);

    JdomSvg.writePrettyFile("Svg16.svg",doc);
    //JdomSvg.writeCompactFile("Svg16.svg",doc);

  }//end main
  //----------------------------------------------------//

}//end class Svg16
//======================================================//

//This is a graphics library that is designed to eliminate
// much of the pain involved in writing JDOM code to
// create SVG output. The library contains individual
// static methods that are used to construct and return
// many of the standard SVG graphics elements.
//Many of the methods have default attribute values.  If
// you need different attribute values for a particular
// graphic element, you can call the setAttribute method
// on the returned value to change the attribute values
// after the method returns.
//Many of the methods set the stroke attribute value to
// black and set the stroke-width attribute value to 1.
// If you don't want to be able to see the outline of the
// shape, change the stroke-width attribute value to 0.
class JdomSvg{
  //----------------------------------------------------//

  //This method writes the XML code into an output file
  // in pretty-print format. The pretty-print format
  // is less efficient than the compact format, but it
  // is very useful during test and debugging because
  // you can view source in your browser and the XML
  // code will be reasonably well formatted.
  public static void writePrettyFile(
                              String fname, Document doc){
    try{
      FileOutputStream out = new FileOutputStream(fname);

      XMLOutputter xmlOut =
               new XMLOutputter(Format.getPrettyFormat());
      xmlOut.output(doc,out);

      out.flush();
      out.close();
    }catch (IOException e){
      System.err.println(e);
    }//end catch
  }//end writePrettyFile
  //----------------------------------------------------//

  //This method writes the XML code into an output file
  // in whitespace-normalized format.
  public static void writeCompactFile(
                              String fname, Document doc){
    try{
      FileOutputStream out = new FileOutputStream(fname);

      XMLOutputter xmlOut =
              new XMLOutputter(Format.getCompactFormat());
      xmlOut.output(doc,out);

      out.flush();
      out.close();
    }catch (IOException e){
      System.err.println(e);
    }//end catch
  }//end writePrettyFile
  //----------------------------------------------------//

  //This method constructs and returns a reference to an
  // SVG root element node named svg.
  //By default, the min-x and min-y attribute values of
  // the viewBox are set to 0 0 and the value of the
  // preserveAspectRatio is set to none.
  //The svg element represents the canvas on which
  // various shapes can be drawn. The width and height
  // attribute values of the svg element establish the
  // physical size of the canvas on the screen. The
  // values of the viewBox attribute establish the
  // size of the canvas in "user units."  The
  // dimensions of the viewbox map directly into the
  // dimensions of the canvas.  This makes it possible
  // for the programmer to work in dimensions that are
  // convenient, such as 1000x1000, instead of having
  // to work with less convenient dimensions such as
  // 459x459.
  //Setting the value of the preserveAspectRatio
  // attribute to none prevents the system from
  // attempting to automatically preserve the aspect
  // ratio.  In this case, it is probably a good idea
  // for the programmer to make the ratio of the height
  // and width of the viewbox the same as the ratio of
  // the height and width of the canvas. That way, a
  // circle will look like a circle instead of looking
  // like an ellipse.
  public static Element makeSvg(
                      String ns,//namespace URI
                      int svgWidth,//width of the canvas
                      int svgHeight,//height of the canvas
                      int vbWidth,//width of the viewBox
                      int vbHeight//height of the viewBox
                      ){
    Element svg = new Element("svg",ns);

    //Set default attribute values.
    svg.setAttribute("version","1.1");
    svg.setAttribute("preserveAspectRatio","none");
    String vbMinX = "0 ";
    String vbMinY = "0 ";

    //Set user-specified attribute values. Note the
    // format that is required to construct the attribute
    // value for the viewBox. If you need to call the
    // setAttribute method after this method returns to
    // change the attribute value for the viewBox
    // attribute, you will need to comply with the format
    // requirements for that value.
    svg.setAttribute("width",""+svgWidth);
    svg.setAttribute("height",""+svgHeight);
    svg.setAttribute("viewBox",
             vbMinX + vbMinY + ""+vbWidth + " "+vbHeight);

    return svg;
  }//end makeSvg
  //----------------------------------------------------//

  //This method constructs and returns a description node
  // for a given namespace and a given parent.
  public static Element makeDescription(
              Element parent,//The parent of this element.
              String nameSpace,//The namespace.
              String text//Text content for this element.
              ){
    Element desc = new Element("desc",nameSpace);
    parent.addContent(desc);
    desc.setText(text);

    return desc;
  }//end makeDescription
  //----------------------------------------------------//

  //This method constructs and returns a comment node
  // for a given parent.
  public static Comment makeComment(
              Element parent,//The parent of this element.
              String text//Text content for this element.
              ){
    Comment comment = new Comment(text);
    parent.addContent(comment);

    return comment;
  }//end makeComment
  //----------------------------------------------------//

  //This method constructs and returns a rect node for a
  // given parent in a given namespace.  By default,the
  // stroke is black, the stroke-width is 1, and the fill
  // is none.
  public static Element makeRect(
                  Element parent,
                  String namespace,
                  int x,//Coordinate of upper-left corner.
                  int y,//Coordinate of upper-left corner.
                  int width,
                  int height
                  ){
    Element rect = new Element("rect",namespace);
    parent.addContent(rect);

    //Set default attribute values.
    rect.setAttribute("fill","none");
    rect.setAttribute("stroke","black");
    rect.setAttribute("stroke-width","1");

    //Set user specified attribute values.
    rect.setAttribute("x",""+x);
    rect.setAttribute("y",""+y);
    rect.setAttribute("width",""+width);
    rect.setAttribute("height",""+height);

    return rect;
  }//end makeRect
  //----------------------------------------------------//

  //This method constructs and returns an ellipse node for
  // a given parent in a given namespace.  By default,the
  // stroke is black, the stroke-width is 1, and the fill
  // is none.
  public static Element makeEllipse(
                                Element parent,
                                String namespace,
                                int cx,//Center coordinate
                                int cy,//Center coordinate
                                int rx,//Horizontal radius
                                int ry //Vertical radius
                                ){
    Element ellipse = new Element("ellipse",namespace);
    parent.addContent(ellipse);

    //Set default attribute vales
    ellipse.setAttribute("fill","none");
    ellipse.setAttribute("stroke","black");
    ellipse.setAttribute("stroke-width","1");

    //Set user specified attribute values.
    ellipse.setAttribute("cx",""+cx);
    ellipse.setAttribute("cy",""+cy);
    ellipse.setAttribute("rx",""+rx);
    ellipse.setAttribute("ry",""+ry);

    return ellipse;
  }//end makeEllipse
  //----------------------------------------------------//

  //This method constructs and returns a polyline node for
  // a given parent in a given namespace..
  //The array of type int[], which contains the
  // coordinates for each point in the polyline, must
  // contain an even number of values for the polyline
  // to be drawn correctly. Otherwise, it simply won't be
  // drawn.
  //The values are extracted from the array and treated
  // as coordinate values x1,y1, x2,y2, x3,y3 ... etc.
  // By default, the stroke is set to black one pixel
  // wide with no fill.
  //The main difference between a polyline and a polygon
  // (see below) is that a polygon is automatically closed
  // by connecting the last point to the first point.
  // While you may close a polyline if you cause the
  // coordinates of the last point to match the
  // coordinates of the first point, it is not
  // automatically closed as in the case of a polygon.
  //Be careful if you fill a polyline that is not closed.
  // The results may not be what you expect to see.
  static Element makePolyline(Element parent,
                              String namespace,
                              int[] points){//See above.
    Element polyline = new Element("polyline",namespace);
    parent.addContent(polyline);

    //Set default attributes
    polyline.setAttribute("stroke","black");
    polyline.setAttribute("stroke-width","1");
    polyline.setAttribute("fill","none");

    //Set user specified attributes.
    String dataPoints = "";
    for(int cnt=0;cnt<points.length;cnt++){
      dataPoints += "" + points[cnt] + " ";
    }//end for loop
    polyline.setAttribute("points",dataPoints);

    return polyline;
  }//end makePolyline
  //----------------------------------------------------//

  //This method constructs and returns a polygon node for
  // a given parent in a given namespace..
  //The array of type int[], which contains the
  // coordinates for each point in the polyline, must
  // contain an even number of values for the polyline
  // to be drawn correctly. Otherwise, it simply won't be
  // drawn.
  //The values are extracted from the array and treated
  // as coordinate values x1,y1, x2,y2, x3,y3 ... etc.
  // By default, the stroke is set to black one pixel
  // wide with no fill.
  //The main difference between a polygon and a polyline
  // (see above) is that a polygon is automatically closed
  // by connecting the last point to the first point.
  static Element makePolygon(Element parent,
                             String namespace,
                             int[] points){
    Element polygon = new Element("polygon",namespace);
    parent.addContent(polygon);
    //Set default attributes.
    polygon.setAttribute("stroke","black");
    polygon.setAttribute("stroke-width","1");
    polygon.setAttribute("fill","none");

    //Set user specified attributes.
    String dataPoints = "";
    for(int cnt=0;cnt<points.length;cnt++){
      dataPoints += "" + points[cnt] + ",";
    }//end for loop
    polygon.setAttribute("points",dataPoints);

    return polygon;
  }//end makePolygon
  //----------------------------------------------------//

  //This method constructs and returns a line node for a
  // given parent in a given namespace.  By default,the
  // stroke is black and the stroke-width is 1.
  public static Element makeLine(
                                Element parent,
                                String namespace,
                                int x1,//Start coordinate
                                int y1,//Start coordinate
                                int x2,//End coordinate
                                int y2 //End coordinate
                                ){
    Element line = new Element("line",namespace);
    parent.addContent(line);

    //Set default attribute vales
    line.setAttribute("stroke","black");
    line.setAttribute("stroke-width","1");

    //Set user specified attribute values.
    line.setAttribute("x1",""+x1);
    line.setAttribute("y1",""+y1);
    line.setAttribute("x2",""+x2);
    line.setAttribute("y2",""+y2);

    return line;
  }//end makeLine
  //----------------------------------------------------//

  //This method constructs and returns a circle node for a
  // given parent in a given namespace.  By default,the
  // stroke is black, the stroke-width is 1, and the fill
  // is none.
  public static Element makeCircle(
                                Element parent,
                                String namespace,
                                int cx,//Center coordinate
                                int cy,//Center coordinate
                                int r  //Radius
                                ){
    Element circle = new Element("circle",namespace);
    parent.addContent(circle);

    //Set default attribute vales
    circle.setAttribute("fill","none");
    circle.setAttribute("stroke","black");
    circle.setAttribute("stroke-width","1");

    //Set user specified attribute values.
    circle.setAttribute("cx",""+cx);
    circle.setAttribute("cy",""+cy);
    circle.setAttribute("r",""+r);

    return circle;
  }//end makeCircle
  //----------------------------------------------------//

}//end class JdomSvg

//======================================================//
|
Copyright 2007, Richard G. Baldwin. Reproduction in whole or in part in any form or medium without express written permission from Richard Baldwin is prohibited.
Richard has participated in numerous consulting projects and he frequently provides onsite training at the high-tech companies located in and around Austin, Texas. He is the author of Baldwin's Programming Tutorials, which have gained a worldwide following among experienced and aspiring programmers. He has also published articles in JavaPro magazine.
In addition to his programming expertise, Richard has many years of practical experience in Digital Signal Processing (DSP). His first job after he earned his Bachelor's degree was doing DSP in the Seismic Research Department of Texas Instruments. (TI is still a world leader in DSP.) In the following years, he applied his programming and DSP expertise to other interesting areas including sonar and underwater acoustics.
Richard holds an MSEE degree from Southern Methodist University and has many years of experience in the application of computer technology to real-world problems.
Keywords
java jaxp svg "scalable vector graphics"
-end-