Published: September 25, 2007
By Richard G. Baldwin
Java Programming Notes # 1541
Scope of the series of tutorial lessons
In the earlier lesson titled "Understanding Lighting in the Java 3D API" (see Resources), I taught you about, and showed you examples of many of the important features of scene illumination in the Java 3D API. I also provided the source code for a complete Java 3D lighting simulator program that you can use to experiment with light in the Java 3D API. At the end of that tutorial, I stated "I will explain how the Java 3D lighting simulator program works in subsequent parts of this multi-part lesson."
Upon reflection, I have decided that it would be impractical for me to attempt to explain the inner workings of that very complicated program without first explaining a large number of basic concepts involved in writing programs using the Java 3D API. Therefore, beginning with this lesson, my plan is to start with the basics and to publish a series of tutorial lessons in which I will work my way up to the general complexity exhibited by the program that I provided in the earlier lesson. This will be the first lesson in that series.
Compiling and running Java 3D programs
In order to compile and run programs using the Java 3D API, you will need to download and install the Java 3D API software. As of the date of this writing, version 1.5.0 was available for download.
In addition, you will need to download and install either Microsoft DirectX or OpenGL. All of the sample programs in this series of tutorials were developed and tested using Microsoft DirectX. They were not tested using OpenGL.
Most of what I will be teaching you about the use of the Java 3D API was learned by studying the tutorial by Dennis J Bouvier (see Resources) along with some other online material listed in Resources.
You can also download the Bouvier tutorial as a set of PDF files along with the source code for the example programs in his tutorial. I recommend that you take advantage of those resources as well.
I recommend that you open another copy of this document in a separate browser window and use the following links to easily find and view the figures and listings while you are reading about them.
I recommend that you also study the other lessons in my extensive collection of online Java tutorials. You will find a consolidated index at www.DickBaldwin.com.
A Java 3D virtual universe
Obviously, programs that you create using the Java 3D API will have a strong visual component. We can refer to that visual component as a Java 3D virtual universe.
Bouvier tells us that "A Java 3D virtual universe is created from a scene graph. A scene graph is created using instances of Java 3D classes. The scene graph is assembled from objects to define the geometry, sound, lights, location, orientation, and appearance of visual and audio objects." He then goes on to tell us just how complicated it can be to create such a virtual universe.
A simplified approach
Fortunately, he then introduces us to the class named SimpleUniverse and tells us "Using the SimpleUniverse class in Java 3D programming significantly reduces the time and effort needed to create the view branch graph. Consequently, the programmer has more time to concentrate on the content." He then goes on to provide the recipe shown in Figure 1 for using the SimpleUniverse class to create a Java 3D virtual universe.
Figure 1. Bouvier's recipe for using the SimpleUniverse class to create a Java 3D virtual universe.
1. Create a Canvas3D Object 2. Create a SimpleUniverse object which references the earlier Canvas3D object a. Customize the SimpleUniverse object 3. Construct content branch 4. Compile content branch graph 5. Insert content branch graph into the Locale of the SimpleUniverse |
This is the general recipe that will be used to develop most of the example programs in this lesson.
The SimpleUniverse class
The Sun documentation for the SimpleUniverse class provides the class description shown in Figure 2.
Figure 2. Sun's description of the SimpleUniverse class.
| This class sets up a minimal user environment to quickly and easily get a Java 3D program up and running. This utility class creates all the necessary objects on the "view" side of the scene graph. Specifically, this class creates a locale, a single ViewingPlatform, and a Viewer object (both with their default values). Many basic Java 3D applications will find that SimpleUniverse provides all necessary functionality needed by their applications. More sophisticated applications may find that they need more control in order to get extra functionality and will not be able to use this class. |
Constructors for the SimpleUniverse class
The documentation for the Java 3D API version 1.5.0 shows six non-deprecated constructors for the SimpleUniverse class. A representative constructor, which accomplishes item 2 in the recipe shown in Figure 1, is described in Figure 3.
Figure 3. Description of one of the available constructors for the SimpleUniverse class.
SimpleUniversepublic SimpleUniverse(Canvas3D canvas)
|
Methods of the SimpleUniverse class
According to the documentation, v1.5.0 of the SimpleUniverse class defines eight methods and inherits thirteen methods from the VirtualUniverse class. You will see examples of many of those methods in the sample programs in this and subsequent lessons.
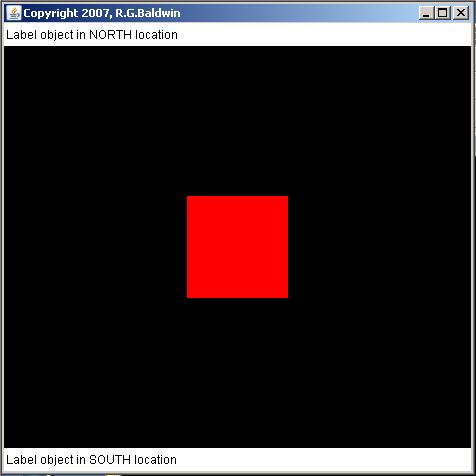
In this lesson, I will walk you through a series of increasingly more complex programs to eventually present and explain a program named Java3D003, which produces the Java 3D virtual universe shown in Figure 4.
Figure 4. Target Java 3D virtual universe for this lesson.
|
|
While the results shown in Figure 4 don't look all that impressive, an understanding of the steps required to produce that output is critically important in your progress down the path of learning how to effectively use the Java 3D API.
This program is shown in its entirety in Listing 1 below, and is also reproduced in Listing 8 for your convenience.
Listing 1. The program named Java3D001.
/*File Java3D001.java
Copyright 2007, R.G.Baldwin
Tested using Java SE 6, and Java 3D 1.5.0 running under
Windows XP.
**********************************************************/
import com.sun.j3d.utils.universe.SimpleUniverse;

public class Java3D001{

  public Java3D001(){//constructor
    SimpleUniverse universe = new SimpleUniverse(null);

    //The following constructor that doesn't explicitly
    // pass null as a parameter appears to produce exactly
    // the same result:
    // SimpleUniverse universe = new SimpleUniverse();
  }//end constructor

  public static void main(String[] args){
    new Java3D001();
  }//end main

}//end class Java3D001
|
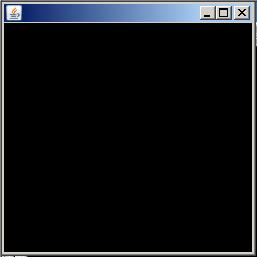
Purpose of the program
|
The purpose of this program is to illustrate an extremely simple Java 3D program. When this code is compiled and executed, an empty window appears on the screen as shown in Figure 5.
Figure 5. Virtual universe produced by program Java3D001.
|
|
Description of the window
The window shown in Figure 5 looks just like an AWT Frame object with:
As near as I have been able to determine, when this approach is used to create the 3D universe, the programmer has no control over the size of the window and has no way to put a title into the title bar. Note however, that the window is resizable, meaning that the size can be changed by the user dragging the corners of the window.
Program termination
Clicking the close (X) button in the upper-right corner of the window causes the program to terminate, even though the program does not register a WindowListener object on the frame. This does not match the default behavior of an AWT Frame object.
Automatic creation of a Canvas3D object
The appearance of the window on the screen confirms the following statement regarding the Canvas3D parameter to the SimpleUniverse constructor shown in Figure 3:
"Passing in null will cause this parameter to be ignored and a canvas to be created by the utility."
It is interesting to note that instantiating the SimpleUniverse object by calling the constructor that takes no parameters appears to produce exactly the same result, although that is not noted in the Sun documentation for that constructor. In other words, the Sun documentation for the noarg constructor does not indicate that a canvas will be automatically "created by the utility".
Back to the recipe
Because the Canvasd3D object is automatically created, the instantiation of the SimpleUniverse object in Listing 1 satisfies items 1 and 2 of the recipe for creating a Java 3D virtual universe shown in Figure 1. Note, however, that this program doesn't create any content for the universe, so the last three items in that recipe are not satisfied by this program.
Program testing
All of the programs in this tutorial were tested using Java SE 6, and Java 3D 1.5.0 running under Windows XP.
The Group class
Apparently, in order to add visual objects to the universe, you must encapsulate references to those objects in a container of type Group, and add that container to the universe. Figure 6 tells us some of what Sun has to say about the Group class.
Figure 6. Sun's description of the Group class.
| The Group node object is a general-purpose grouping node. Group nodes have exactly one parent and an arbitrary number of children that are rendered in an unspecified order (or in parallel). Null children are allowed; no operation is performed on a null child node. Operations on Group node objects include adding, removing, and enumerating the children of the Group node. The subclasses of Group node add additional semantics. |
The BranchGroup class
One of the subclasses that "add additional semantics" to a node of type Group is the class named BranchGroup. Figure 7 tells us some of what Sun has to say about the BranchGroup class.
Figure 7. Sun's description of the BranchGroup class.
The BranchGroup serves as a pointer to the root of a scene graph branch;
BranchGroup objects are the only objects that can be inserted into a
Locale's set of objects. A subgraph, rooted by a BranchGroup node can be
thought of as a compile unit. The following things may be done with
BranchGroup:
|
Quite a lot of information
There is quite a lot of information in Figure 7 that I won't discuss in this lesson (although I do plan to discuss much of that information in subsequent lessons). For purposes of this program, the behavior that is highlighted in boldface is what we will be using. In particular, this program will construct and populate a BranchGroup object with a reference to a visual object of type ColorCube. That BranchGroup node will then be inserted into the virtual universe.
The program listing
The program named Java3D002 is shown in its entirety in Listing 2 and reproduced in Listing 9 for your convenience.
Listing 2. The program named Java3D002.
/*File Java3D002.java
Copyright 2007, R.G.Baldwin
Tested using Java SE 6, and Java 3D 1.5.0 running under
Windows XP.
**********************************************************/
import com.sun.j3d.utils.universe.SimpleUniverse;
import com.sun.j3d.utils.geometry.ColorCube;
import javax.media.j3d.BranchGroup;

public class Java3D002{
  public Java3D002(){//constructor
    SimpleUniverse universe = new SimpleUniverse(null);

    universe.getViewingPlatform().
                              setNominalViewingTransform();

    BranchGroup branchGroup = new BranchGroup();
    branchGroup.addChild(new ColorCube(0.2));

    universe.addBranchGraph(branchGroup);
  }//end constructor

  public static void main(String[] args){
    new Java3D002();
  }//end main

}//end class Java3D002
|
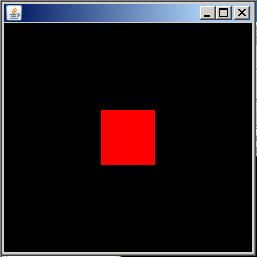
Purpose of the program
The purpose of this program is to update Java3D001 to add a visual object to the virtual universe while keeping the program as simple as possible. When this code is compiled and executed, a window appears on the screen the same as in Figure 5. However, the window is no longer empty. Instead, it contains a red square as shown in Figure 8.
Figure 8. Virtual universe produced by Program Java3D002.
|
|
The red square is actually a cube
The red square in Figure 8 is actually one face of a 3D cube with colored faces. It doesn't appear to be three-dimensional in Figure 8 because it is being viewed from a location that is on a line perpendicular to the center of the red face of the 3D cube.
Set the viewing platform
The code in Listing 2 begins by instantiating a SimpleUniverse object as before. Then it sets the viewing platform.
What is a viewing platform?
To make a long story short, setting the viewing platform establishes the apparent location of the viewer's eye relative to the scene. You can control the apparent position of the viewer's eye by calling the setViewPlatform method on the ViewingPlatform object, passing a reference to an object of type ViewPlatform as a parameter to the method.
The setNominalViewingTransform method
|
As a shortcut, the ViewingPlatform class provides a method that can be used to adjust the apparent location of the viewer's eye to a location that is often satisfactory.
According to Sun, setting the viewing platform by calling the method named setNominalViewingTransform causes the ViewPlatform to be moved back along the Z-axis so that objects at the origin spanning the normalized X range of -1.0 to +1.0 can be fully viewed across the width of the window.
The BranchGroup object
Next, the code in Listing 2 instantiates a new BranchGroup node object and populates it with a reference to a single visual object of the class ColorCube.
A ColorCube object
Sun describes a ColorCube object as a "Simple color-per-vertex cube with a different color for each face." There are two constructors for the ColorCube class. One of the constructors constructs a cube with its center at the origin and a default size. If I interpreted the description of that constructor correctly, the default length of any edge is two units (from -1 to 1).
The other constructor, which is the one used in Listing 2, also constructs a cube with its center at the origin in 3D space. This constructor allows the programmer to specify the size of the cube, by providing a float value for the parameter named scale.
Once again, if I interpreted the description of that constructor correctly, the length of any edge of the cube is twice the value of scale. Thus, the length of each edge for the cube constructed in Listing 2 would be 0.4 units (from -0.2 to 0.2). To a first degree of approximation, given what we learned above, the length of each edge of the cube shown in Figure 8 should be a little more than twenty-percent of the size of the window. Once again, keep in mind that the visible face on the cube is between the viewer's eye and the origin in 3D space so it will appear to be larger than would be the case if that face were located at the origin.
Call the addBranchGraph method on the universe
Here is part of what Sun has to say about the method named addBranchGraph:
"Used to add Nodes to the geometry side (as opposed to the view side) of the scene graph. This is a short cut to getting the Locale object and calling that object's addBranchGraph() method."
Thus, the last statement in the constructor in Listing 2 adds the BranchGroup object containing the visual ColorCube object to the universe, making the cube visible in Figure 8.
Satisfies the recipe
The code shown in Listing 2 satisfies all of the steps specified in the recipe shown in Figure 1 with the exception of the fourth step having to do with compiling the content branch. This is a fairly complicated topic, but that step effectively happens automatically in the code in Listing 2. I will have more to say on this topic in future lessons.
While there is much more to learn in order to effectively use the Java 3D API, at least at this point you know some of the fundamentals. You have seen a program that satisfies all of the steps required in the recipe in Figure 1.
There is still a problem
However, there is a problem that we have not yet addressed. As I mentioned earlier, when this approach is used to create the 3D universe, the programmer has no control over the size of the window and has no way to put a title into the title bar. In some cases that may be a problem and in other cases it may not be a problem. In any event, this situation is not hard to resolve. That will be the purpose of the next sample program.
Because of its length, I will present and discuss this program in fragments. The program named Java3D003 begins in Listing 3. A complete listing of the program is provided in Listing 10 for your convenience.
Purpose
The purpose of this program is to illustrate how to extend the Frame class and use a Canvas3D object to gain control over the size and title bar of a Java 3D application. The program also illustrates how to gain control over the layout of the Frame containing the universe along with other components that may also appear in the Frame.
Screen output
The screen output for this program is shown in Figure 4. When this program is compiled and executed, a Frame object appears on the screen with a black Canvas3D object containing the virtual universe in the CENTER location of the Frame. The universe contains a visual ColorCube object.
Label objects appear in the NORTH and SOUTH locations of the Frame.
When the user resizes the Frame, the size of the ColorCube object changes in proportion to the size of the Canvas3D object.
When the user clicks the close button in the upper-right corner of the Frame, the program terminates.
Program code
Listing 3. Beginning of the program named Java3D003.
public class Java3D003 extends Frame{

  public Java3D003(){//constructor
    setLayout(new BorderLayout());

    //Create a Canvas3D object to be used for rendering the
    // Java 3D universe.  Place it in the CENTER of the
    // Frame.
    Canvas3D canvas = new Canvas3D(
               SimpleUniverse.getPreferredConfiguration());

    add(BorderLayout.CENTER,canvas);
|
Listing 3 performs the following operations:
Of the three operations, only the second one deserves any further discussion at this point.
A Canvas3D object
The Sun documentation provides a long and detailed description of the various aspects of a Canvas3D object. I won't repeat that information here, but will recommend that you study the description in the Sun documentation carefully.
Constructors for the Canvas3D class
Version 1.5.0 of the Java 3D API provides two constructors for the Canvas3D class. They differ primarily in terms of whether the rendering is performed on-screen or off-screen. The version used in this program is the on-screen rendering version. Figure 9 tells us some of what Sun has to say about this constructor.
Figure 9. One of two Canvas3D constructors.
Canvas3Dpublic Canvas3D(java.awt.GraphicsConfiguration graphicsConfiguration)
|
Could be difficult to construct
Here is an excerpt from the java.awt.GraphicsConfiguration class description:
"The GraphicsConfiguration class describes the characteristics of a graphics destination such as a printer or monitor. There can be many GraphicsConfiguration objects associated with a single graphics device, representing different drawing modes or capabilities. The corresponding native structure will vary from platform to platform."
As you might surmise from Figure 9 and the above quotation, it could be fairly difficult to construct the GraphicsConfiguration object required as a parameter for any specific platform. Fortunately, the SimpleUniverse class provides a static convenience method named getPreferredConfiguration that eliminates the requirement for us to explicitly construct that object. The Sun documentation states that the invocation of this method will find and return "The best GraphicsConfiguration object for the system." That convenience method is called to construct the new Canvas3D object in Listing 3.
Two placeholder objects
Listing 4 creates a pair of Label objects to serve as placeholders. These objects are positioned in the NORTH and SOUTH locations of the Frame to illustrate control over the layout of the Frame containing the virtual universe.
Listing 4. Two placeholder objects.
    add(BorderLayout.NORTH,new Label(
                        "Label object in NORTH location"));
    add(BorderLayout.SOUTH, new Label(
                        "Label object in SOUTH location"));
|
Create empty Java 3D universe
Listing 5 creates an empty Java 3D universe and associates it with the Canvas3D object in the CENTER of the Frame.
Listing 5. Create empty Java 3D universe.
SimpleUniverse universe = new SimpleUniverse(canvas); |
Note that the constructor used in Listing 5 is different from the constructor used in Listings 1 and 2. In the two previous cases, a null parameter was passed to the constructor for the SimpleUniverse object and the required Canvas3D object was automatically created. In Listing 5, a reference to an existing Canvas3D object was passed to the SimpleUniverse constructor in order to associate the new universe with the existing Canvas3D object.
Same code as before
The code in Listing 6 is essentially the same code as I explained in conjunction with Listing 2. Therefore, I won't repeat that explanation.
Listing 6. Same code as before.
    //Set the apparent position of the viewer's eye.
    universe.getViewingPlatform().
                              setNominalViewingTransform();

    //Put a visible object in the universe
    BranchGroup branchGroup = new BranchGroup();
    branchGroup.addChild(new ColorCube(0.2));

    universe.addBranchGraph(branchGroup);
|
Legacy code from earlier tutorials
The code in Listing 7 is the same as code that I have used and explained in dozens (possibly hundreds) of earlier tutorials. Therefore, it shouldn't require any further explanation.
Listing 7. Legacy code from earlier tutorials.
    //Set the Frame size and title and make it all visible.
    setSize(475,475);
    setTitle("Copyright 2007, R.G.Baldwin");
    setVisible(true);

    //This listener is used to terminate the program when
    // the user clicks the X in the upper-right corner of
    // the Frame.
    addWindowListener(
      new WindowAdapter(){
        public void windowClosing(WindowEvent e){
          System.exit(0);
        }//end windowClosing
      }//end new WindowAdapter
    );//end addWindowListener
  }//end constructor
  //-----------------------------------------------------//

  public static void main(String[] args){
    Java3D003 thisObj = new Java3D003();
  }//end main
  //-----------------------------------------------------//

}//end class Java3D003
|
Listing 7 contains the end of the class and the end of the program. In addition, it is almost the end of the lesson.
I encourage you to copy the code from Listings 8 through 10 into your text editor, compile it, and execute it. Experiment with it, making changes, and observing the results of your changes. Remember, you will need to download and install the Java 3D API plus either Microsoft DirectX or OpenGL to compile and execute these programs. See Downloads for links to the web sites from which this material can be downloaded.
In this lesson, I taught you to master the basics of starting from scratch to create and populate a Java 3D virtual universe, and how to place that universe in a Frame along with other GUI components using the layout manager of your choice. While the results shown in Figure 4 don't look that impressive, they are critically important in your progress down the path of learning how to effectively use the Java 3D API.
The material covered in this lesson is just the tip of the Java 3D iceberg. There is much more for you to learn if you want to make effective use of the Java 3D API.
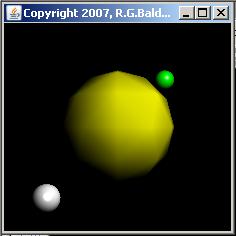
In the next lesson, I will teach you how to write a Java 3D program to create and populate a virtual universe that looks similar to the one shown in Figure 10.
Figure 10. Virtual universe from a future lesson.
|
|
As a minimum, I will use this program to teach you how to use the following Java 3D classes along with various methods belonging to those classes:
Listing 8. Listing for program Java3D001.
/*File Java3D001.java
Copyright 2007, R.G.Baldwin

The purpose of this program is to illustrate an extremely
simple Java 3D program.

When this code is compiled and executed, an empty window
appears on the screen.  The window looks just like an
AWT Frame object with a Color.BLACK background, an empty
title bar, and a size of 255x255 pixels.

Clicking the close button in the upper-right corner of the
window causes the program to terminate, even though the
program does not register a WindowListener object on the
frame.

As near as I have been able to determine, when this
approach is used to create the 3D universe, the programmer
has no control over the size of the window and has no way
to put a title into the title bar.  Note however, that the
window is resizable, meaning that the size can be changed
by the user dragging the corners of the window.

Tested using Java SE 6, and Java 3D 1.5.0 running under
Windows XP.
**********************************************************/
import com.sun.j3d.utils.universe.SimpleUniverse;

public class Java3D001{

  public Java3D001(){//constructor
    SimpleUniverse universe = new SimpleUniverse(null);

    //The following constructor that doesn't explicitly
    // pass null as a parameter appears to produce exactly
    // the same result:
    // SimpleUniverse universe = new SimpleUniverse();
  }//end constructor

  public static void main(String[] args){
    new Java3D001();
  }//end main

}//end class Java3D001
|
Listing 9. Listing for program Java3D002.
/*File Java3D002.java
Copyright 2007, R.G.Baldwin

The purpose of this program is to update Java3D001 to add
an object to the virtual universe while keeping the
program as simple as possible.

When this code is compiled and executed, a window appears
on the screen the same as in the Java3D001.  However, the
window is no longer empty.  Instead, it contains a red
square.  The red square is actually one face of a 3D cube
with colored faces.

Tested using Java SE 6, and Java 3D 1.5.0 running under
Windows XP.
**********************************************************/
import com.sun.j3d.utils.universe.SimpleUniverse;
import com.sun.j3d.utils.geometry.ColorCube;
import javax.media.j3d.BranchGroup;

public class Java3D002{

  public Java3D002(){//constructor
    SimpleUniverse universe = new SimpleUniverse(null);

    universe.getViewingPlatform().
                              setNominalViewingTransform();

    BranchGroup branchGroup = new BranchGroup();
    branchGroup.addChild(new ColorCube(0.2));

    universe.addBranchGraph(branchGroup);
  }//end constructor

  public static void main(String[] args){
    new Java3D002();
  }//end main

}//end class Java3D002
|
Listing 10. Listing for program Java3D003.
/*File Java3D003.java
Copyright 2007, R.G.Baldwin

The purpose of this program is to illustrate how to
extend the Frame class and use a Canvas3D object to
gain control over the size and title bar of a Java 3D
application.  It also illustrates how to gain control over
the layout of the universe in conjunction with other
components that may also appear in the Frame along with
the universe.

When this code is compiled and executed, a Frame object
appears on the screen with a black Canvas3D object
containing the virtual universe in the CENTER location of
the Frame.  The universe contains a visual ColorCube
object.  Labels appear in the NORTH and SOUTH locations of
the Frame.

When the user resizes the Frame, the size of the ColorCube
object changes in proportion to the size of the Canvas3D
object.

When the user clicks the close button in the upper-right
corner of the Frame, the program terminates.

Tested using Java SE 6, and Java 3D 1.5.0 running under
Windows XP.
**********************************************************/
import com.sun.j3d.utils.universe.SimpleUniverse;
import javax.media.j3d.Canvas3D;
import javax.media.j3d.BranchGroup;
import com.sun.j3d.utils.geometry.ColorCube;
import java.awt.Frame;
import java.awt.Label;
import java.awt.BorderLayout;
import java.awt.event.WindowAdapter;
import java.awt.event.WindowEvent;

public class Java3D003 extends Frame{

  public Java3D003(){//constructor
    setLayout(new BorderLayout());

    //Create a Canvas3D object to be used for rendering the
    // Java 3D universe.  Place it in the CENTER of the
    // Frame.
    Canvas3D canvas = new Canvas3D(
               SimpleUniverse.getPreferredConfiguration());
    add(BorderLayout.CENTER,canvas);

    //Create a pair of Label objects to serve as
    // placeholders.  Position them in the NORTH and SOUTH
    // locations in the window.
    add(BorderLayout.NORTH,new Label(
                        "Label object in NORTH location"));
    add(BorderLayout.SOUTH, new Label(
                        "Label object in SOUTH location"));

    //Create an empty Java 3D universe and associate it
    // with the Canvas3D object in the CENTER of the
    // Frame.
    SimpleUniverse universe = new SimpleUniverse(canvas);

    //Set the apparent position of the viewer's eye.
    universe.getViewingPlatform().
                              setNominalViewingTransform();

    //Put a visible object in the universe
    BranchGroup branchGroup = new BranchGroup();
    branchGroup.addChild(new ColorCube(0.2));

    universe.addBranchGraph(branchGroup);

    //Set the Frame size and title and make it all visible.
    setSize(475,475);
    setTitle("Copyright 2007, R.G.Baldwin");
    setVisible(true);

    //This listener is used to terminate the program when
    // the user clicks the X in the upper-right corner of
    // the Frame.
    addWindowListener(
      new WindowAdapter(){
        public void windowClosing(WindowEvent e){
          System.exit(0);
        }//end windowClosing
      }//end new WindowAdapter
    );//end addWindowListener
  }//end constructor
  //-----------------------------------------------------//

  public static void main(String[] args){
    Java3D003 thisObj = new Java3D003();
  }//end main
  //-----------------------------------------------------//

}//end class Java3D003
|
Copyright 2007, Richard G. Baldwin. Reproduction in whole or in part in any form or medium without express written permission from Richard Baldwin is prohibited.
Richard has participated in numerous consulting projects and he frequently provides onsite training at the high-tech companies located in and around Austin, Texas. He is the author of Baldwin's Programming Tutorials, which have gained a worldwide following among experienced and aspiring programmers. He has also published articles in JavaPro magazine.
In addition to his programming expertise, Richard has many years of practical experience in Digital Signal Processing (DSP). His first job after he earned his Bachelor's degree was doing DSP in the Seismic Research Department of Texas Instruments. (TI is still a world leader in DSP.) In the following years, he applied his programming and DSP expertise to other interesting areas including sonar and underwater acoustics.
Richard holds an MSEE degree from Southern Methodist University and has many years of experience in the application of computer technology to real-world problems.
Keywords
"java 3D" SimpleUniverse ColorCube BranchGroup Canvas3D canvas
setNominalViewingTransform getPreferredConfiguration
-end-