Figure 1 The J2EE Deployment Tool Main Screen
Java Programming, Lecture Notes # 1313
This lesson is also the fourth lesson in a miniseries intended to get you up and running with Sun's Enterprise JavaBeans(TM) very quickly.
Along the way, you will learn how to start and stop the J2EE server. You will learn how to expose the J2EE options, and you will learn how to start the deploytool program.
You will get your first look at the deploytool GUI and use it to create your application.
The lessons in this miniseries will show you the steps involved in writing, compiling, deploying and executing a simple bean. The discussion will be brief, and is intended primarily to get you to the point that you can get something running very quickly.
More details in subsequent lessons
Subsequent lessons will come back and fill in the gaps to help you more-fully understand each of the steps.
Subsequent lessons will also teach you about the different kinds of beans and how to use those beans in different situations.
Recommended supplementary reading
It is strongly recommended that you study the previous lesson entitled Enterprise JavaBeans(TM), Getting Started with EJB, Part 3 before embarking on this lesson.
Additional supplementary material that I have written is available at Gamelan. As of the date of this writing, Gamelan does not maintain a consolidated index to my Java tutorials. Therefore, they may be difficult to locate on the Gamelan site. A consolidated index with links to the tutorials on the Gamelan site is available at Baldwin's Java Programming Tutorials.
The required steps
An earlier lesson entitled Getting Started with EJB, Part 1 contained a list of the required steps for writing, compiling, deploying and executing a simple bean. Abbreviated versions of the first seven steps in that list are repeated below.
The first six steps were discussed in earlier lessons, and I am assuming that you have completed those steps. Having completed them, you should have the class files necessary to deploy your bean into the J2EE server.
Deployment of the bean is the subject of the last step in the above list, and is also the topic of this lesson.
Watch that last step, it's a big one
The last step shown above is a big one, so I have subdivided it into several sequential lessons, beginning with the previous lesson entitled Getting Started with EJB, Part 3.
The detailed steps
In this group of lessons associated with deployment, I am walking you through the detailed steps necessary to deploy your new bean in the J2EE server. Those steps are:
This lesson deals with the first of the three steps.
Viewing tip
Deploying a bean can be very tedious and a little complex. This and the following lessons provide screen shots of the critical steps in the process. You may find it useful to open another copy of this lesson in a separate browser window. That will make it easier for you to scroll back and forth and refer to earlier material and figures, without losing your place.
Beans versus beans
Just in case you are reading this lesson without having read the earlier lessons in this series, I will tell you that an enterprise bean is not the same thing as a JavaBean Component(TM), as discussed in my series of tutorial lessons beginning with lesson number 500.
At this point, you should have the following three class files as a result of compiling the bean class and the two interfaces during previous lessons. Make sure that you have them all located conveniently in the same directory.
A complete listing of the bean program and the two required interfaces is provided near the end of this lesson.
Step-by-step instructions
This lesson will contain the step-by-step instructions for creating a new J2EE application named HelloApp and for storing the application in a file named HelloApp.ear.
Windows NT
These instructions are written for use with a Windows NT operating system. If you are using some other operating system, you will need to translate these instructions into the terminology of that operating system.
Get two Command Prompt windows
The first thing that you need to do is to open two Command Prompt windows. If you know how to use the JDK from Sun for compiling and executing Java applications at the command line, you already know how to do this.
If you don't know how ...
If you don't already know how to do it, you should be able to open the Start menu (on the lower left of your screen) and then select Programs. There you should find an entry for Command Prompt. Choose that entry to open the window. Do this twice to open two separate windows.
From here on, I will refer to the Command Prompt windows simply as windows.
Start the J2EE server
To start the J2EE server running, enter the following command at the prompt in one of the windows:
j2ee -verbose
The -verbose parameter causes output from the server to be displayed in the window where the server is running. If you leave it off, output from the server will be sent to a log file.
The screen output
Listing 1 is a partial screen shot of the kinds of information that
you should see on your screen as the server starts and progresses to the
ready state. For brevity, I have deleted several lines of material
in the middle of the sequence and have replaced those lines with ...
I also inserted some manual line breaks to force the material to fit in
this narrow format.
| C:\jnk>j2ee -verbose
J2EE server Listen Port: = 1049
J2EE server startup complete. Listing 1 |
The last line is critical
The critical thing to note is that the last line shown above should appear indicating that the server is ready. If it doesn't appear, there is no point in starting the deployment tool (as described later).
No prompt should appear
The prompt should not reappear until you stop the server. If the prompt does reappear, it will probably be preceded by an error message of some sort indicating that the server did not start running properly.
J2EE options
You can learn more about the J2EE options by entering the parameter
-? as shown by the (reformatted) screen shot in Listing 2,
| C:\jnk>j2ee -?
Java 2 Enterprise Edition Server
-stop Stop the J2EE server. Listing 2 |
Stopping the server
As you can see, to stop the server, you must enter j2ee -stop in a different window. When you do that, the prompt will reappear in the window in which the server is running.
The J2EE version
Entry of j2ee -version while writing this lesson produced the following output.
Java 2 Enterprise Edition version 1.2.1
Thus, the deployment instructions that follow in this and subsequent lessons are based on version 1.2.1.
Using later versions of J2EE
As new versions of J2EE are released, adjustments may need to be made to these instructions, depending on the changes that are made in succeeding versions of J2EE. Hopefully the product will remain sufficiently stable that these instructions will continue to be a useful guide in getting your first enterprise bean up and running, even for later versions of J2EE.
Starting the deployment tool
Once the server has been started successfully, you need to start the deployment tool. To do this, enter the following command at the prompt in another window:
deploytool
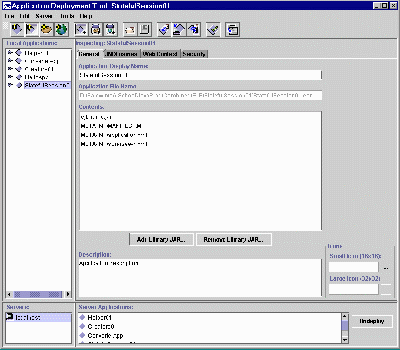
The main deployment screen
A splash screen will appear first. This will be followed by a screen that looks similar to Figure 1. This is the main deployment screen.
This screen is a very large dialog box with dimensions of 841 x 736 pixels, so I had to reduce it considerably to make it fit in this format.
Previously deployed applications
The tall rectangular area on the left in Figure 1 contains a tree display showing previously deployed applications. When you deploy your first application, this frame will initially be empty. As you deploy new applications into the server, they will appear in this frame each time you start the deployment tool running.
Figure 1 The J2EE Deployment Tool Main Screen
Additional screen shots
I will supplement the deployment instructions with screen shots like Figure 1 at critical points in the process. Because of the need to reduce the image for display, you often won't be able to read the text in the screen shots. However, I believe that the screen shots will help you make sure that you are at the right place in the deployment process.
Color coded for clarity
The following text will be a mixture of action statements and explanatory text. I will color the actions statements the following color of blue to make them easy to separate from the explanatory text.
Create your new J2EE application
Here are the steps for creating your new application using the deployment tool:
Your new application has now been created, but at this point it is empty. If you are monitoring the directory specified as the location of the ear file, you should notice that a file named HelloApp.ear has appeared in that directory.
Back to main deployment screen
At this point, you should be back to the screen shown in Figure 1. You can terminate the deployment tool by selecting Exit from the file menu. You can also terminate the server by entering j2ee - stop in a window other than the window in which the server is running.
| /*
File HelloBean.java
Copyright 2000 R.G.Baldwin Rev 9/15/00 This bean receives and
returns a String object
This is a stateless session
bean. According to
Implement the SessionBean
interface.
Tested using Sun j2ee
and JDK 1.3 under
public class HelloBean
implements SessionBean{
public void ejbCreate(){
public String
aBusinessMethod(String str){
public void ejbRemove(){
public void ejbActivate(){
public void ejbPassivate(){
public void setSessionContext(
public HelloBean(){}//public constructor }//end class HelloBean
Listing 3 |
| /*
File HelloHome.java
Copyright 2000 R.G.Baldwin Rev 9/15/00 ***********************************************/ import javax.ejb.*; public interface HelloHome
extends EJBHome{
Listing 4 |
| /*
File Hello.java
Copyright 2000 R.G.Baldwin Rev 9/15/00 ***********************************************/ import javax.ejb.*; import java.rmi.*; public interface Hello
extends EJBObject{
Listing 5 |
Copyright 2000, Richard G. Baldwin. Reproduction in whole or in part in any form or medium without express written permission from Richard Baldwin is prohibited.
Richard has participated in numerous consulting projects involving Java, XML, or a combination of the two. He frequently provides onsite Java and/or XML training at the high-tech companies located in and around Austin, Texas. He is the author of Baldwin's Java Programming Tutorials, which has gained a worldwide following among experienced and aspiring Java programmers. He has also published articles on Java Programming in Java Pro magazine.
Richard holds an MSEE degree from Southern Methodist University and has many years of experience in the application of computer technology to real-world problems.
-end-