

| << Chapter < Page | Chapter >> Page > |
The names of the five variables were listed above . By this point, you should have no difficulty creating variables and causing them to bedisplayed in the Stage, so no further explanation of this aspect of the project should be necessary.
Image 4 shows a full-size view of the programming panel in Image 3 . This panel contains the program code associated with the button.
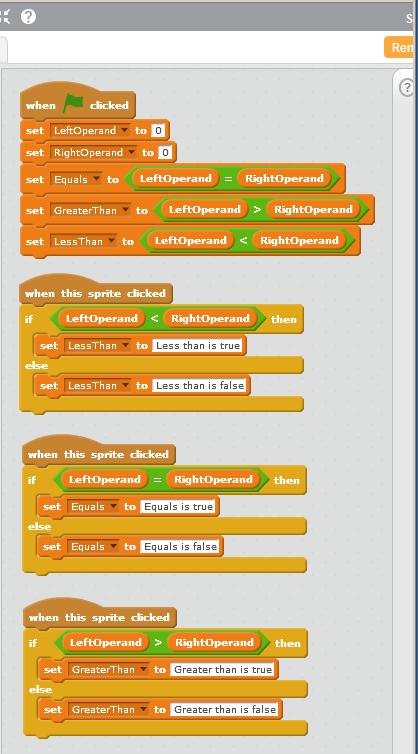
The top script in Image 4 initializes the values of the variables named LeftOperand and RightOperand to zero.
Then it uses relational operators to evaluate three relational expressions in sequence. The results of evaluating those expressions are boolean values (true or false). Those values are used to initialize the values of the variables named Equals , GreaterThan , and LessThan .
The relational expressions are constructed by dropping the orange variable names on either side of the relational operators in the green blocks with the pointed ends.
Image 1 shows the results of evaluating those expressions. When both operands have a value of zero, the results are:
Each of the bottom three scripts in Image 4 are executed when the user clicks the button in the Stage area in Image 3 . These three scripts are very similar. However, they use three different relational operators to compare the values of the left and right operands and they set the values inthree different output variables accordingly.
I will walk you through the construction of one of the bottom three scripts shown in Image 4 with a detailed explanation of each step in the process. You should be able toextend that explanation to the other two scripts.
Image 5 shows the result of
By the way, in case I forgot to tell you before, you can set the name of the sprite to button by selecting the Costumes tab above the toolbox selector panel and entering the name in the text field.

Note the depressed pocket immediately to the right of the word if on the if-else block. We must drop another block of the correct shape into this pocket. The code in that block must evaluate to either true orfalse.
If that code evaluates to true, the code that we will insert into the mouth of the block immediately below the word if will be executed.
If the code that we drop into the pocket evaluates to false, the code that we insert into the mouth of the block immediately below the word else will be executed.
Notification Switch
Would you like to follow the 'Teaching beginners to code' conversation and receive update notifications?

|
|

|
|

|
|

|
|
|
|
|

|
|

|
|

|
|

|
|

|