This module is a lab assignment to better understand the TI DSP/BIOS QUE module.
Introduction
This lab module will help you become familiar with the TI DSP/BIOS v5.x QUE module. Code Composer Studio v4 is used in this module.
Reading
SPRU423 TMS320 DSP/BIOS Users Guide: Read the section title Queues
Lab module prerequisites
This lab module uses aspects of the TSK and SEM modules.
Laboratory
Part 1
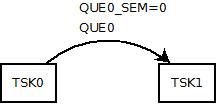
In this part you will be creating two TSKs were one will generate some data and send it to the other TSK in a queue. The transmitting TSK will generate 5 messages to send to the receiving TSK which will print out the content of the message.
Follow the procedure in
Code Composer Studio v4 DSP/BIOS Project to create a new CCS DSP/BIOS project. Your project should have a DSP/BIOS v5.x configuration file using the ti.platforms.sim67xx template (or another appropriate template).
Create a LOG object by right clicking on Instrumentation->LOG and selecting Insert LOG. Change the name to
trace . Set its properties to have a length of 512 and be a fixed buffer.
Change the LOG_system object to have a length of 512.
If using the simulator then change the RTDX interface to Simulator by right clicking on Input/Output->RTDX and bringing up the properties. Change the RTDX mode to Simulator. If you do not do this then when you load your program you will see the error
RTDX application does not match emulation protocol . If you are loading onto an EVM or DSK you leave the setting on JTAG.
Create a QUE object by right clicking on Syncronization->QUE and selecting Insert QUE. This will create a queue called
QUE0 . There are no properties to set (unless you want to change the comment).
Create two TSKs with the following properties
Name:
TSK0 , priority: 1, function:
_funTSK0 .
Name:
TSK1 , priority: 1, function:
_funTSK1 .
On the priority list make sure that
TSK0 is first.
Create a
main.c file and include a
main function that does nothing.
At the top of
main.c make a global structure for your message as follows:
typedef struct MsgObj {
    QUE_Elem elem; /* first field for QUE */Int val; /* message value */
    } MsgObj, *Msg;
In the
main.c file make functions for your TSKs,
funTSK0 and
funTSK1 .
In
funTSK0 , which will generate the data, create a loop that will loop 5 times and in the loop have it:
Allocate memory for a new message
Fill the message value with the message number. Use a command like:
"msg->val = ..."
Print to the trace LOG which message is being generated
Put the message on the queue QUE0
In
funTSK1 , which will receive the data, create a loop that will loop 5 times and in the loop have it:
Check to see if there is a message on the queue and if not then print an error message to the
trace LOG and
return . This will cause the task to be done running and enter the terminated state.
Get the message from the queue
QUE0
Print which message number was read
Free the buffer that was used for the message
Start the debug session.
Open the log view by selecting
Tools->RTA->Printf Logs .
Run the program and record the results.
Describe in detail the processing that is occurring.
Part 2
Change the priority of
TSK1 to 2.
Start the debug session.
Run the program and record the results.
How does the execution change? Describe in detail.
Part 3
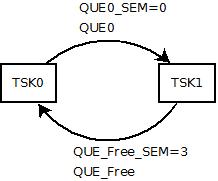
In this part you will be adding a semaphore to synchronize the two tasks using the queue. The semaphore will keep track of how many messages are in the queue.
Setup for Part 3
Copy the
main.c file from above to a new file
main3.c . Remove the
main.c from your project and add
main3.c .
Add a semaphore to your configuration file and call it
QUE0_SEM . It should be initialized to 0.
Keep the priority of
TSK0 set to 1 and
TSK1 set to 2.
In
main3.c change the following:
In
funTSK0 after the
QUE_put add a
SEM_post for
QUE0_SEM .
In
funTSK1 delete the code that checks to see if there is a message on the queue and replace it with a
SEM_pend for
QUE0_SEM . Use
SYS_FOREVER for the timeout on the pend.
Start the debug session.
Run the program and record the results.
Describe in detail the processing that is occurring.
Part 4
Notice that in Part 3 that if the program ran for a long time that the code would have to continually allocate memory for a message and then de-allocate it when it was done using the message. This could take up a substantial amount of time and could cause fragmentation of the memory space. A better method is to have two queues where one queue holds messages that are free and one holds messages that contain data being transmitted from one task to another. In this part you will be adding another queue which will be initialized by adding some free messages to it. Also, another semaphore will be added to track the number of free messages on the free queue.
Setup for Part 4 with a free message queue
Copy the
main3.c file from above to a new file
main4.c . Remove the
main3.c from your project and add
main4.c .
Add another semaphore to your configuration file and call it
QUE_Free_SEM . It should be initialized to 0.
Create a QUE object and call it
QUE_Free .
Change the priority of
TSK1 to 1 and make sure
TSK0 is first in the list.
To the
main function add code that loops 3 times and adds 3 messages to the queue
QUE_Free . You will need to allocate memory for the messages. Be sure to post to
QUE_Free_SEM after adding the message to the queue. This will set up the free messages to be used in the program. These messages can then be used and reused without having to allocate and free memory over and over again.
In the function
funTSK0 delete the code that allocates a message and replace it will code that pends on
QUE_Free_SEM and then gets a message from
QUE_Free .
In the function
funTSK1 delete the code that frees the message buffer and replace it will code that puts the message on
QUE_Free and then posts to
QUE_Free_SEM .
Start the debug session.
Run the program and record the results.
Describe in detail the processing that is occurring.